
Research notes: about styling block based themes via theme.json type pages, e.g. Twenty Twenty Three or Four.
Quick and Dirty Start
As a quick and dirty start you can copy either the theme.json file or one of the additional styles in the ./styles folder of the theme in Twenty Twenty Four. Save your file as ./styles/myFile.json. The styles are:
- ember.json
- fossil.json
- ice.json
- maelstrom.json
- mint.json
- onyx.json
- rust.json
Since these files are more simple than theme.json in the root directory of the theme, they are good starting points for developing your personalized theme styles.
Choose a style that is somewhat close to the endresult you want to acheive. Then you’ll have a good starting point for your design.
Give your style a title
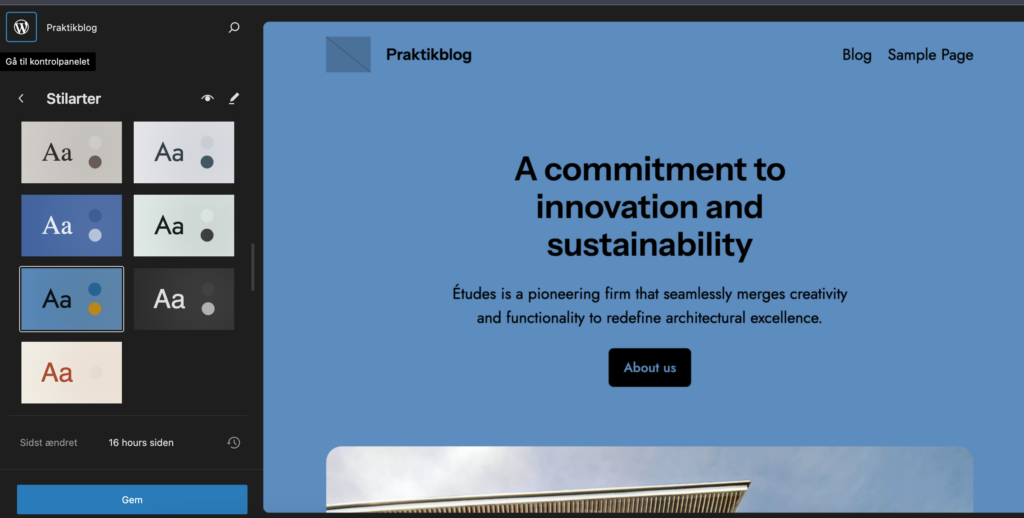
First you have to add the title to the file. As soon as the json file is present in ./styles you will be able to activate it in the Dashboard / Appearance / Styles.
{
	"$schema": "https://schemas.wp.org/trunk/theme.json",
	"version": 2,
	"title": "My new style",
	"settings": {
         ... etc ...
If you work in a copy of the theme.json file, remember to add the “title” : “My Way” key pair. The original theme json is more elaborate than the sample styles, since all blocks are controlled by the file. If you want to create your own theme this may be a good way to work.
If you’re like me it may be more easy to edit the file in your favorite editor, and upload the file to WP. Now you should be able to see your style in Appearance / Editor / Styles:
In the WP theme directory ./styles you’ll find the *.json files that will style your theme. They are similar the theme.json file. In my experience the colors are easy to work with. However, fonts can be a challenge.
If you tamper with the theme.json file problems may arise if you update the theme. Your best option is to add a style in the ./styles directory. Here your code is safe – so in many ways this modus operandi is similar to the child themes that were used before we had the block based themes.
Don’t edit the theme.json file.
Add your own style JSON.
E.g. ./styles/myStyle.json
Below are some notes on how to style with fonts and colors – and other CSS features.
Fonts
The best way to add custom fonts is to download the font from either Google Fonts or another font provider and then use the files after this model:
- First you add the fontface with the filenames.
- Then you can instantiate the font by the triad
- fontfamily, name and slug.
The slug will create CSS-variables. You can use these variables when the block elements are styled. More about this later.
Font File Format: .woff2
According to Carolina Nymark you should use font files in the woff2 format:
“If you choose a font family on https://fonts.google.com/ and then select the “Download family” option, you will only receive a zip file with .
ttffiles. To get the.woff2files, you can use a font converter script or an online converter.”“I recommend using this time saving tool called Google webfonts helper to download the files.”
(Carolina Nymark)
Actually I’ve had strange font problems, perhaps Nymark’s solution is the solution. Sometimes the fonts do not appear no matter what you try. However, now I see that the fonts that gave me problems were actually ttf and odt files. I’ll test this solution and try to use woff2 exclusively.
/** Model: font via a file */

{
    "fontFace": [
        {
            "fontFamily": "Jost",
            "fontStyle": "normal",
            "fontWeight": "100 900",
            "src": ["file:./assets/fonts/jost/Jost-VariableFont_wght.woff2"]
        }
    ],
    "fontFamily": "\"Jost\", sans-serif",
    "name": "Jost",
    "slug": "body"
}

/** Model: standard browser fonts */

/* Sans Serif */
{
    "fontFamily": "-apple-system, BlinkMacSystemFont, avenir next, avenir, segoe ui, helvetica neue, helvetica, Cantarell, Ubuntu, roboto, noto, arial, sans-serif",
    "name": "System Sans-serif",
    "slug": "system-sans-serif"
}

/* Serif */
{
    "fontFamily": "Iowan Old Style, Apple Garamond, Baskerville, Times New Roman, Droid Serif, Times, Source Serif Pro, serif, Apple Color Emoji, Segoe UI Emoji, Segoe UI Symbol",
    "name": "System Serif",
    "slug": "system-serif"
}
Using the Fonts
Mostly the font will not show up after install, which is quite frustrating. Do thus:
- Quit the styles editor
- Purge the browser cache
- Purge the WP cache
- See the webpage frontend – if the font is now visible everything is ok.
- Return to the editor.
- Now you can see the font.
It’s quite cumbersome, and may take a lot of experiments.
Perhaps a good idea is to use an incognito browser window in order to avoid browser cache issues.
How to Add Standard Browser Fonts
Standard fonts are more easy to add. Here is the model for serif and sans serif fonts with the most common fallbacks:
/* Sans Serif */
{
    "fontFamily": "-apple-system, BlinkMacSystemFont, avenir next, avenir, segoe ui, helvetica neue, helvetica, Cantarell, Ubuntu, roboto, noto, arial, sans-serif",
    "name": "System Sans-serif",
    "slug": "system-sans-serif"
}

/* Serif */
{
    "fontFamily": "Iowan Old Style, Apple Garamond, Baskerville, Times New Roman, Droid Serif, Times, Source Serif Pro, serif, Apple Color Emoji, Segoe UI Emoji, Segoe UI Symbol",
    "name": "System Serif",
    "slug": "system-serif"
}
Colours
The colours are straightforeward. Add the colours as an array:
"color": {
    "palette": [
        {
            "color": "#548DBF",
            "name": "Base",
            "slug": "base"
        },
        {
            "color": "#0367A6",
            "name": "Base / Two",
            "slug": "base-2"
        }
    ]
How to Style the Blocks
In the JSON file we can style the elements (aka. Blocks) in the elements section.
How do we implement the fonts and styles in the blocks? Here is a typical sample: styling the button block. Other blocks are styled in a similar manner.
WordPress will create CSS-variables from your JSON-file after this model:
var( –wp–preset–CSS—SLUG )
for example:
var(–wp–preset–font-family–heading)
Below you see the styling of a button by JSON. The example below will define the:
- Border
- Color
- Spacing (whitespace: padding etc.)
- Typography (fontfamily, fontsize, etc.)
- :hover (that’s the way to use pseudo classes
In Practise: Styling the Buttons
Now a button is a fairly typical block. If you can style a button, you know how to style any block.
"elements": {
    "button": {
        "border": {
            "radius": "6px"
        },
        "color": {
            "background": "var(--wp--preset--color--contrast)",
            "text": "var(--wp--preset--color--base-2)"
        },
        "spacing": {
            "padding": {
                "bottom": "0.98rem",
                "left": "1.6rem",
                "right": "1.6rem",
                "top": "0.8rem"
            }
        },
        "typography": {
            "fontFamily": "var(--wp--preset--font-family--heading)",
            "fontSize": "var(--wp--preset--font-size--small)",
            "fontStyle": "normal"
        },
        ":hover": {
            "color": {
                "background": "var(--wp--preset--color--contrast)"
            }
        }
    }
Let’s break down this code a little bit. I have cut out the samples from the code above.
Give the Button Colours
Here is the :hover pseudo style for our button. A color is defined when the mouse pointer hover over the button. The same principle will work for :link, :active, :hover and so on. In this case the color that will be used is contrast:
":hover": {
    "color": {
        "background": "var(--wp--preset--color--contrast)"
    }
}
How to add a font
We can add fonts after a similar manner. The CSS wee need is font-family. So we use –wp–preset–font-family. To the variable we’ll have to add the slug of the selected font which is heading. Now we have constructed the variable:
var(–wp–preset–font-family–heading)
Here is a sample for the site-title block:
"core/site-title": {
    "typography": {
        "fontFamily": "var(--wp--preset--font-family--heading)"
    }
}
Blocks in TT4
Now we have seen how to style one block. Here is a list of styled blocks in the theme.json of TT4, so if you want a deeper study have a look at them, since this article only mentioned “core/button”:
“core/avatar”: {
“core/button”: {
“core/buttons”: {
“core/calendar”: {
“core/categories”: {
“core/code”: {
“core/comment-author-name”: {
“core/comment-content”: {
“core/comment-date”: {
“core/comment-edit-link”: {
“core/comment-reply-link”: {
“core/post-comments-form”: {
“core/comments-pagination”: {
“core/comments-pagination-next”: {
“core/comments-pagination-numbers”: {
“core/comments-pagination-previous”: {
“core/footnotes”: {
“core/gallery”: {
“core/image”: {
“core/list”: {
“core/loginout”: {
“core/navigation”: {
“core/post-author”: {
“core/post-author-name”: {
“core/post-date”: {
“core/post-excerpt”: {
“core/post-featured-image”: {
“core/post-terms”: {
“core/post-title”: {
“core/pullquote”: {
“core/query-title”: {
“core/query-no-results”: {
“core/quote”: {
“core/search”: {
“core/separator”: {
“core/site-tagline”: {
“core/site-title”: {
The list above was made via a simple Bash command in a terminal window on a Mac or Linux system, that will filter out any string that contains core/:
# grep “core/” theme.json
With this information we should be able to style most of the Gutenberg blocks. Here is an even more extensive list of the Gutenberg blocks: click here.
Leave a Reply