WordPress

These days WordPress power more than 40% of all web pages. Sooner or later you will have to use a WordPress solution – and want to tweak it. Here are my tips and tricks for advanced WordPress developers.

  • WP: Fall 2020

    Here is a guide to WordPress 5.5. This version is just released by WordPress (august 2020). We have a brand new block editor with exciting features.

    WordPress

    What’s new in WordPress 5.5?

    By now WordPress is skipped with a fantasctic block editor. Some even predict that the days of mighty Elementor and other competing block editors are counted. You don’t need a plugin in order to create fantastic content. Now WP is faster and more easy to use than ever before. Creating content isn’t harder than using Libre Office.

    WordPress will load faster, and images will load “lazy”. Here is a guide to WordPress with tutorials ranging from installation of WordPress on your web host to advanced features on costum made pages – and themes. If you know your HTML and CSS knowledge about a content managing system is the next logical step.

    Advanced Tweaks

    If you want to tweak a theme and create some advanced stuff that the theme was not meant for you still may to do this in either PHP or use JavaScript with the WordPress REST API. If something is possible in HTML then you can certainly do it in WordPress. That is if you know how to.

    Tutorials

    Below you will find my WordPress 5.5 for Multimedia designers.

    Install WordPress

    If you don’t have WordPress on your webhost yet: here is a tutorial. Follow the step by step tutorial and pause the video while you install.

    The host I use in the video is One.com. Of course this is only a sample.

    Since I use One.com there is a discount offer for you here (and the discount will give me a similar discount too so you will support Multimusen too).

    You can follow the steps on other hosts too. So if your website is on say Unoeuro or something else – just follow the steps of the tutorial.
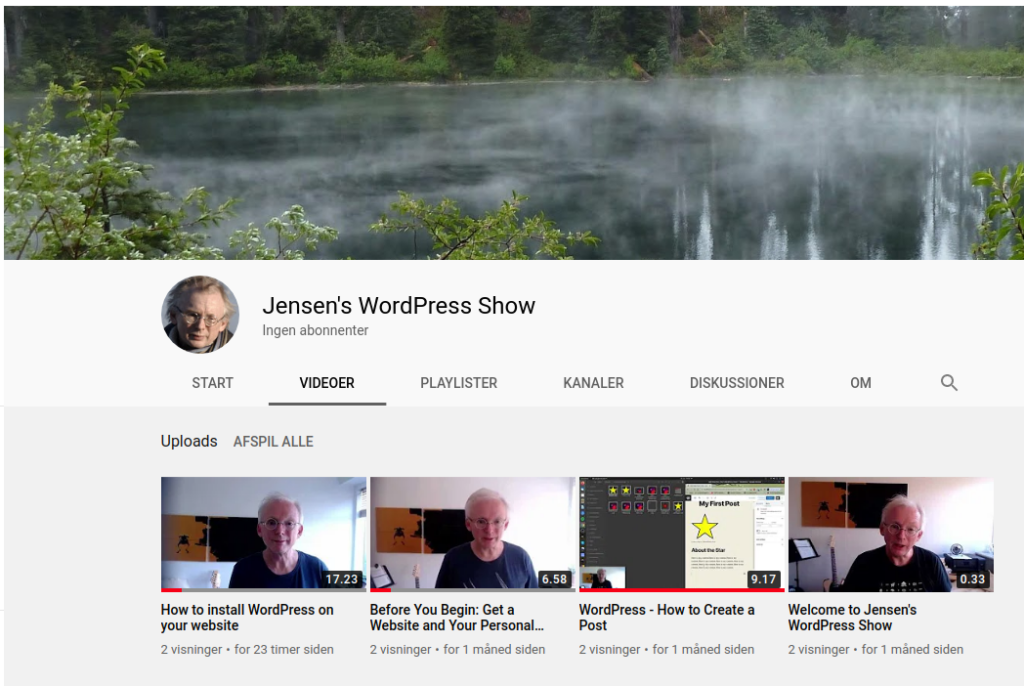
    Jensen’s WordPress Show: Follow the new trends on WordPress

    Jensen’s WordPress Show

    Here is Per’s new WordPress channel on YouTube where you will find more and more videos about WordPress. If you follow my channel you’ll know about the latest trends right away.

    Create a Post

    JavaScript in Gutenberg

    Multimedia designer often add interactive UX elements such as small animations via JavaScript.Use the custom HTML block element. Add your script like this:
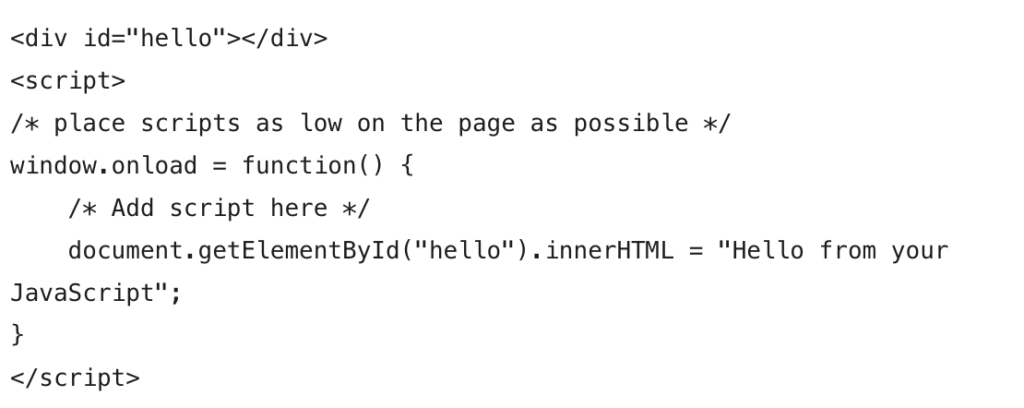
    You have to use window.onload = function( ){ } in order to check that all elements are loaded. Just add whatever scripts you have inside that function. If you use document.getElementById without the window.onload your script will not work.

    The Child Theme

    Why use Child Themes?

    Use a child theme if you want to tweak the theme with your own code or stylesheets. If you change the code in a theme and update to a new version your changes are lost. The changes you make in a child theme are your own.

    Create a Child Theme

    Here is a quick guide to child themes. First you have to create a child theme. Follow the steps in thies tutorial.

    Add Widgets to Your Child Theme Frontpage

    If you choose a static frontpage for WordPress your theme will use the template file front-page.php. In the next tutorial I will add a few wdget areas to the frontpage.

    A Living Document

    Per’s guide to WordPress 5.5 is a living document. During the fall of 2020 I will add more tutorials from my WordPress classes at the Business Academy Aarhus to this page. Eventually you will find tutorials about:

    • Themes
    • Child themes
    • Costum pages
    • Recommended Plugins
    • SEO
    • WordPress Securitu

    Have fun: Code is Poetry.

    More About WordPress

    Did you know: There are more than 50 articles in the WordPress category on Multimusen.dk.

  • Murat Kilic is one of our fellow senior lecturers at Business Academy Aarhus. He is a WordPress expert, and his video will help new WordPress users in many ways.

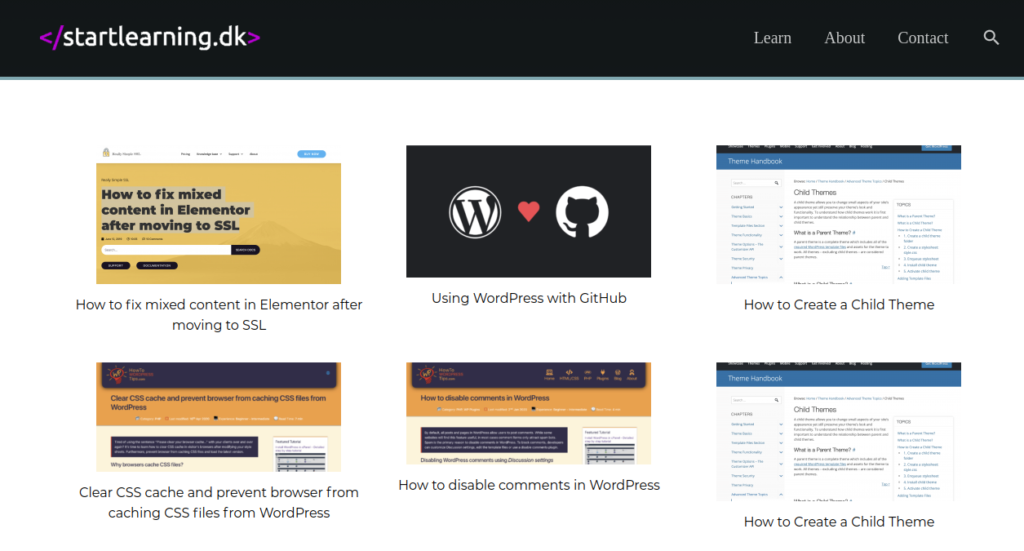
    On Murat’s </ startlearning > there are plenty of cool guides to WordPress tweaks.

    On </ startlearning > you will find Murats videos and tutorials about WordPress tweaks.

    Here are a few of Murat’s tutorials:

    Install WordPress on UnoEuro

  • Som webudvikler har man ofte brug for at kunne eksperimentere med sagerne i en sandkasse, hvor andre ikke har adgang. Her er en vejledning i at sætte WordPress op på din localhost – det vil sige en WordPress, der virker på netværket derhjemme.

    Sådan sætter du WordPress op på din localhost (1:2)
    Sådan sætter du WordPress op på din localhost (2:2)

    Her er de vigtigste links fra disse tutorials:

    Læs mere om WordPress i min bog “WordPress in the Classroom” (2017). Her får du blandt andet historien om, hvordan WordPress themes har set ud gennem tiderne – og du kan lære mere om, hvordan man selv kan bygge et theme.

    Opsætning af databasen i Windows
    I videoen er password = root og bruger = root; men sådan er det ikke på et Windows system. Her er bruger = root og passwordet er en tom linje.

    NB: Denne tutorial er udviklet til et forløb på Multimediedesigneruddannelsen, hvor klasserne blandt andet lærer at sætte et WordPress-udviklingsmiljø op på en localhost.

  • How to install WordPress on your PC or Mac

    When you develop a web site it is often more convenient to work on a local computer.

    A) Install the Apache Server MAMP

    B) Install WordPress on MAMP

    Set up WordPress on localhost

    In order to run WordPress needs a server environment with PHP and a MySQL database. Here you have several options. Whether you prefer one or the other does not matter much. Here are a few options, choose one of them:

    After installing the localhost, you can install WordPress on your local machine. Follow these instructions. If you prefer to follow a video tutorial, here is one more:

    Test content

    Of course you could write a lot of test content, just to see how every HTML element, any image or whatever works. A better alternative is this: use the WordPress test unit. Here you download test pages, posts and images – and then you will be able to inspect whether everything works as it should.

    The Theme Unit Test consist of a xml file with posts, pages, images and so on. You can import them via Tools > Import. You may have to add a plugin in order to import.

    In fact this option is very practical. You can import and export content from a localhost to your online WordPress when everything is ready. But first you should try out some themes, and see how they behave with the test content.

    In the menu section assign the test menu to the menu location. Now you are ready to see your theme in action.

    Try out a few themes

    As soon as you have the test content you might want to test a few themes. In the Dashboard go to Themes > Appearance and search for new themes. There are thousands of themes out there, so try to find something that looks like the design you want. In my opinion you should go for an open source theme. Not because it’s “free”, but because these themes have a code-base that’s more easy to change. Often the so-called professional themes have a horrible code, and it is meant to be so. If the user is not confused, how could they continue to sell more solutions?

    A Few Useful Plugins

    When you have found a good theme, you should add a few plugins. Whatever you choose is a matter of taste, but I’d recommend these as a starting point:

    • Jetpack (performance, tweaks, speed and more)
    • Akismet (fight spam)
    • A page builder, like:
      • Elementor
      • Page Builder (Site Origin)
      • Or just use the standard Gutenberg editor (it is better than most people think).
    • For SEO
      • Yoast
      • The SEO Framework
    • Security
      • WP Limit Login Attempts
    • Webshop
      • WooCommerce (very popular solution)

    There are thousands of plugins for galleries, portfolios, shops, images and so on.

    Create Content

    As soon as these things are done, you are ready to create the actual content. When we develop web solutions it is best practise to work with real content, rather than the boring Lorem Ipsum.

    In order to avoid confusion do this:

    1. Delete the content from the Theme Unit Test
    2. Create real content:
      1. Pages for static content, such as “About Us”
      2. Posts for the blog posts
    3. Add widgets

    Remember to use Categories and Tags. It will improve your SEO and give more power to your menus.

    When you create the content, try you can try page builder!

    Pagebuilding with Gutenberg

    You should try out Gutenberg. It has many of the features, that you expect to find in Elementor and friends. WordPress’ new editor was not popular among developers when it was introduced.

    The following tutorial is a fine introduction to Elementor by Adam Preiser. If you like the tutorial you can visit his tutorials on https://www.wpcrafter.com/ .

    Pagebuilder: Elementor

    Elementor is a pagebuilder plugin. You can drag and drop content elements where you want them. And if you have wireframes, you can imitate a basic wireframe in a few minutes.

    From localhost to the Web

    When your content is ready for production, you will have to export the content and the theme. The theme is separated from the content – that’s why you must do the export in two steps. But first you’ll have to install WordPress on a server.

    Most web hotels have a “WordPress in one Click” option. Just create the WordPress site. Give it a name. And you’re ready to go. The next steps are:

    1. Install the theme (in the same way as you did on the local machine).
    2. Install all the plugins you want to use.

    As soon as this is ready, you go to your local machine. Enter the Dashboard > Tools > Export – and export all content.

    Now you go to your online version of WordPress and choose import. Remember to check the box with import media files. If you do so the local images will be copied to the online media library.

    Now your site is online, and ready for whatever purposes you or your clients may have.

    FAQ

    Sometimes things work fine, but now and then we run into troubled waters. In this section I have listed some common problems, we see again and again in the multimedia classes.

    Problem: you try to install a theme or a plugin, and get a prompt where you are asked to use FTP.
    Solution: Check the folder permissions. Make sure, that the server has write and execute permissions in the folders.

    Problem: I get a database connection error during WordPress install on MAMP.
    Solution: In MAMP the password and user is ‘root’.

    Problem: I get a database connection error on XAMPP.
    Solution: On Windows the user is root and the password is blank. On Mac the user and password is root.

    Problem: XAMPP crashes.
    Solution: Use MAMP … 😉

    In my experience XAMPP has a steep learning curve, and often errors occur out of the blue.

    So if you work on either Mac or Windows I’d recommend MAMP.

  • Here’s a short and handy tutorial about the Siteorigin PageBuilder. In Pagebuilder each row will get an id. Then each row will get an id in the Pagebuilder settings.

    Now the video does not tell this, but I guess that Pagebuilder will set bookmarks on the webpage, as in:

    <h2 id="row-about-us">About us ...</h2>

    In the WordPress menu the internal links will be used. The menu will link to #row-about-us, and Pagebuilder will create markup somewhat like in this sample:

    <a href="#row-about-us">About us</a>

    Now onepagers tend to scroll in a cool slow way. You can do this via some JavaScript. I guess there’s a plugin for it too.

  • In this tutorial you will learn how to create a WordPress theme almost from scratch via the theme skeleton Underscores.

    Download Underscores

    1. Go to http://underscores.me/ and enter the name of your theme in the input box.
    2. Then click enter, and you’ll get a zip with all the theme files in a folder.
    3. Install the theme via the Dashboard in WordPress.

    Now you have a very basic theme. There is a menu, but it’s horrible, or so it seems. In fact you’ve got a dropdown menu – so that’s kind of a head start. And that’s the idea of Underscores. From here it’s a matter of styling, but where are the files we need?


    Style.css

    Have a look in the style.css file. Here your theme name and author is defined. Add your name and the URI to the website, or even better to your Github repository. Since you’re working on a home hacked theme, you may do stupid things. So enter your credentials e.g. (see my sample style.css here):


    Theme Name: Abracadabra
    Theme URI: https://github.com/asathoor/underscores-and-sass
    Author: Per Thykjaer Jensen and Underscores.me
    Author URI: https://multimusen.dk
    Description: The 2017/18 theme for WordPress based on Underscores. Features: SASS, Gulp, Bower, Font Awesome, jQuery.
    Version: 0.5
    License: GNU General Public License v2 or later
    License URI: https://www.gnu.org/licenses/gpl-2.0.html
    Text Domain: petj-17
    Tags: custom-background, custom-logo, custom-menu, featured-images, threaded-comments, translation-ready, responsive, two-columns, custom-header-image


    Sidebar – Content or Content – Sidebar

    Since Michael Heileman designed the Kubrick theme in 2004 the standard blog design became something like a sandwhich with a header and footer as the buns. Between the header and footer you’d see some content and a sidebar. So the blog designer could choose between content-sidebar or sidebar-content. Of course you don’t have to do this, but the standard WordPress design still use the magick formula: header.php, footer.php, sidebar.php – and a filename. If there are no other files, WordPress will use index.php as a fallback. All of these files are found among the Underscores files.

    Underscores made it easy to create a basic design, with content and a sidebar to the right or left of the content.


    Layouts

    In the folder layouts you’ll find two files with the CSS for the basic layout:

    • content-sidebar.css
    • sidebar-content.css

    So if you want a classic blog layout, you can copy-paste the content of the one you fancy to style.css. Here is the CSS from content-sidebar.css:

    .content-area {
     float: left;
     margin: 0 -25% 0 0;
     width: 100%;
    }
    .site-main {
     margin: 0 25% 0 0;
    }
    .site-content .widget-area {
     float: right;
     overflow: hidden;
     width: 25%;
    }
    .site-footer {
     clear: both;
     width: 100%;
    }

    Now you have a traditional blog design.


    Responsive Styles

    Of course these styles are not responsive at all. You still have to refine your design with media queries and so on. Since the CSS in media queries are quite redundant a SASS mixin may come in handy (see this sample).


    @media screen and (min-width: 100px) and (max-width: 760px) {
     @include responsive(); // sidebar to bottom
     body {
     font-size: 123%;
     }
    }


    Custom Header Image

    The Underscores theme does not support a custom header image. Many themes give you this option, so how do you implement the feature? First you have to add this to the functions.php file:

    $args = array(
     'flex-width' => true,
     'flex-height' => true,
     'default-image' => get_template_directory_uri() . '/images/clouds.jpg',
    );
    add_theme_support( 'custom-header', $args );

    Then open the header.php file, and add the following where you want the image to appear:

    <img src="<?php header_image(); ?>" height="<?php echo get_custom_header()->height; ?>" width="<?php echo get_custom_header()->width; ?>" alt="">

    From now on the user is able to choose his own header images from the media. This short sample also demonstrates, that you can edit any file in the theme.


    Custom Pages

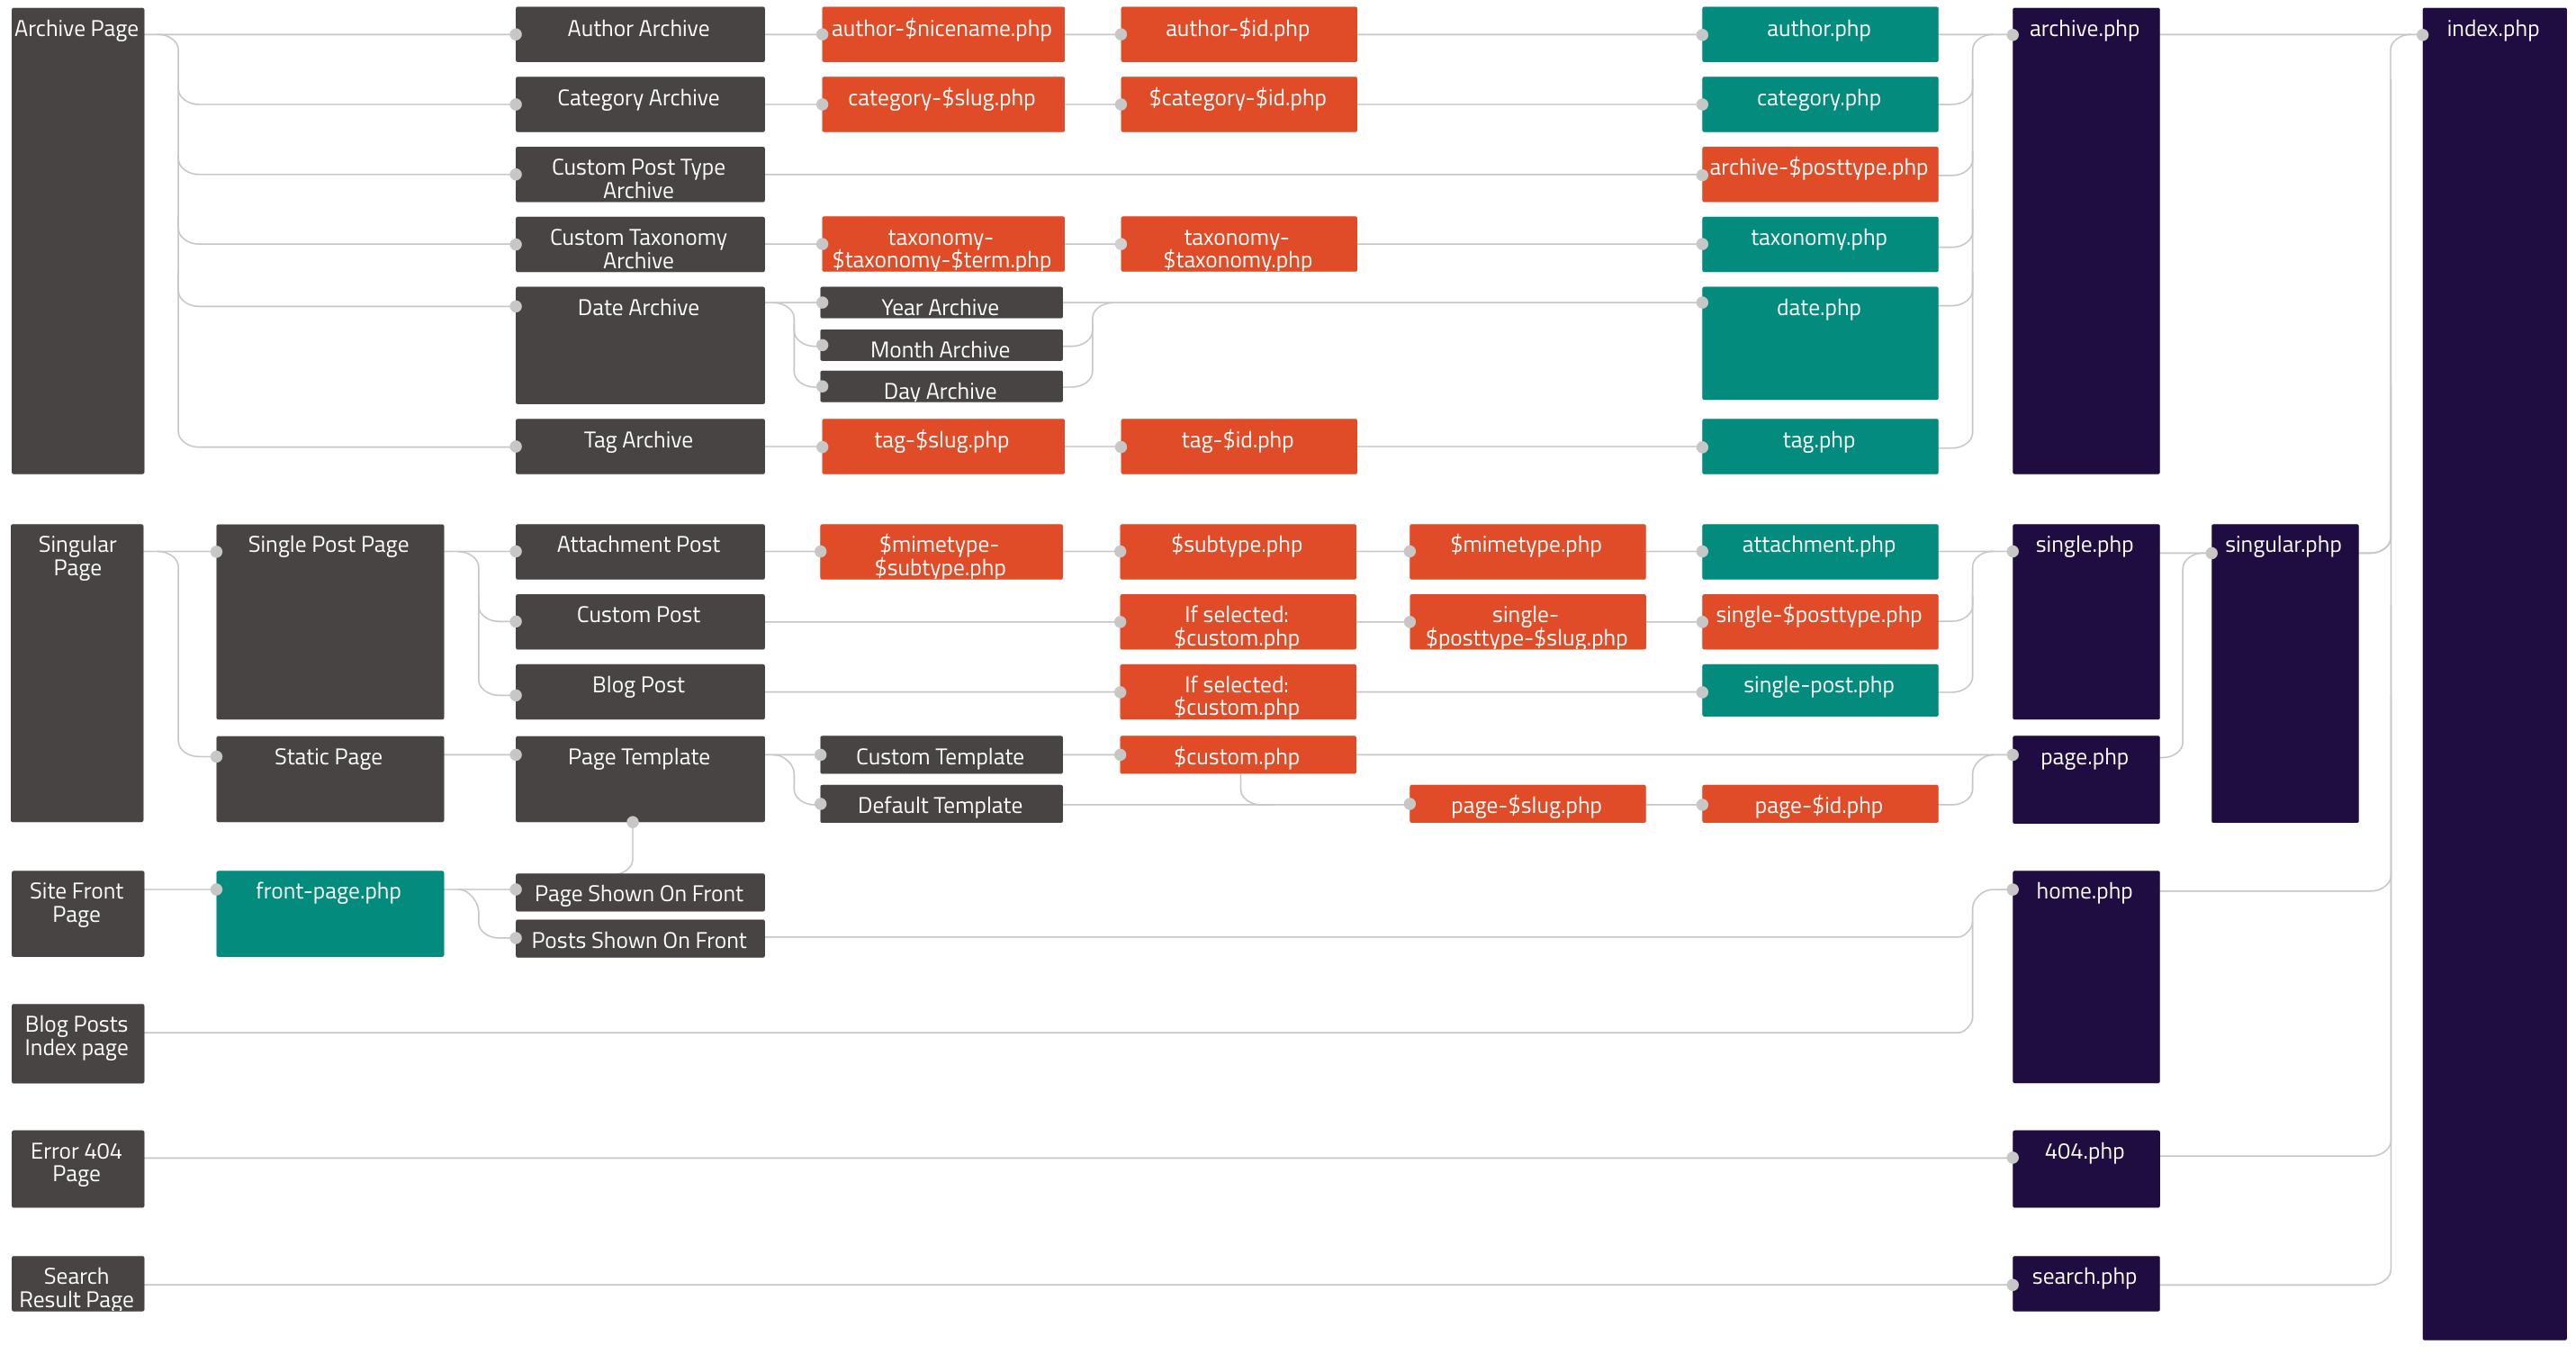
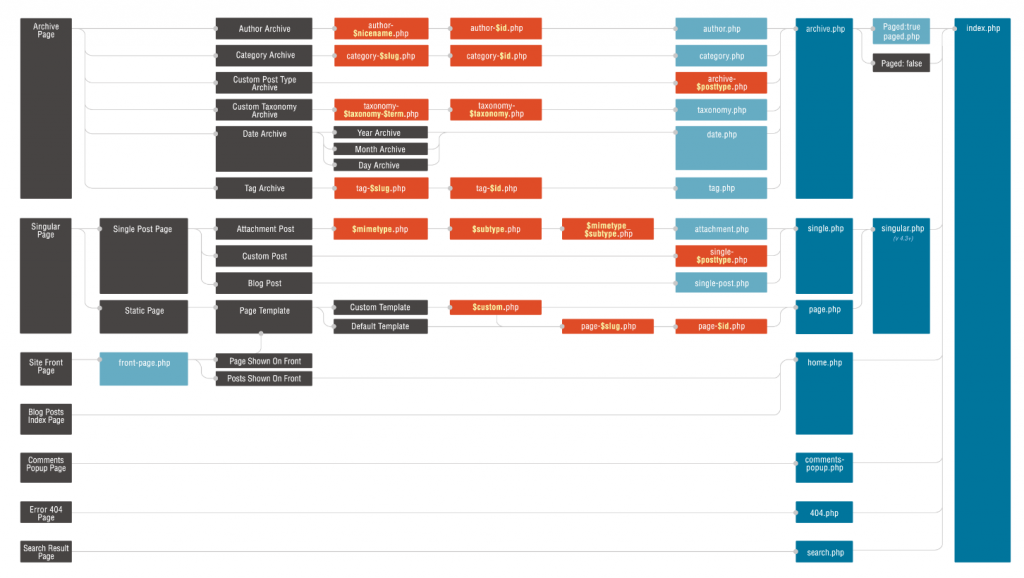
    In WordPress custom pages have to follow a certain naming convention. You can see the system in the template hierarchy.

    The template hierarchy
    The template hierarchy found on the WordPress Codex.


    Let’s say that you want a custom design on the front page. In the template hierarchy you can see that the WordPress will look for the frontpage code in the file front-page.php.

    I’d like to design my frontpage in Siteorigin’s PageBuilder. So I need a frontpage that does not interfer with Pagebuilder. And I don’t want a headline. A fast head start is to copy a file and use it as a model. Remove what you don’t want. Add what you need. In this case the result was extremely simple:

    get_header(); ?>
    
    <div id="primary" class="content-area">
     <main id="main" class="site-main">
     <?php
     // the loop
     while ( have_posts() ) : the_post();
     get_template_part( 'template-parts/content', 'frontpage' );
     
     endwhile; // End of the loop.
     ?>
    
    </main><!-- #main -->
     </div><!-- #primary -->
    
    <?php
    //get_sidebar();
    get_footer();

    The loop will get template parts from the file ../template-parts/content-frontpage.php. Here is the loop part for the full width PageBuilder content:

     <article id="post-<?php the_ID(); ?>" <?php post_class(); ?>>
        <?php the_content(); ?>
     </article><!-- #post-<?php the_ID(); ?> -->
    

    This part of the loop will print the content, but not the headline. If you want the headline feel free to add the_header() and similar loop tags (see this article).

    It’s a Theme

    With Underscores you’ll learn what it takes to create a WordPress theme almost from scratch. Underscores is the basis of many themes – among them the core WordPress theme Twenty Eleven.

  • Multimusen's costum front-page.php
    Multimusen’s costum front-page.php (september 2017). The layers are animated by a parallax script.

    For multimedia designer an online portfolio is a must. The industry expect you to have one. But what if you have found a nice open source theme, but you need a really stunning front page? Or a costum gallery for your productions? Or a kick ass CV?

    Step 1) Create a Child Theme

    The code presented in this tutorial is based on my tw17child. The child theme is based on the Twenty Seventeen theme. The code is available on Github.

    1. Install your open source theme via the Dashboard or by uploading a zip file.
    2. Create a folder with the name of your child theme.
    3. Then create a new file in the folder. Name the file style.css:
    /*
    Theme Name:   Twenty Seventeen Child
    Theme URI:    http://example.com/twenty-fifteen-child/
    Description:  Twenty Seventeen Child Theme
    Author:       Per Thykjær Jensen
    Author URI:   https://multimusen.dk
    Template:     twentyseventeen
    Version:      1.0.0
    License:      GNU General Public License v2 or later
    License URI:  http://www.gnu.org/licenses/gpl-2.0.html
    Tags:         one-column, two-columns, right-sidebar, flexible-header, accessibility-ready, custom-colors, custom-header, custom-menu, custom-logo, editor-style, featured-images, footer-widgets, post-formats, rtl-language-support, sticky-post, theme-options, threaded-comments, translation-ready
    Text Domain:  tw17child
    */
    

    As soon as the style.css is ready you’ll be able to see the child theme in the Dashboard. But the styles are not loaded. In WordPress styles and scripts are loaded via the enqueue function in functions.php.

    1. Create a new empty file. Save it as functions.php.
    2. Add styles by enqueue:
    /**
    * Styles: both parent and child
    */
    function my_theme_enqueue_styles() {
      $parent_style = 'parent-style';
    
      wp_enqueue_style( $parent_style,
      get_template_directory_uri()
      . '/style.css' );
      wp_enqueue_style( 'child-style',
      get_stylesheet_directory_uri() . '/style.css',
      array( $parent_style ),
      wp_get_theme()->get('Version')
      );
    }
    add_action( 'wp_enqueue_scripts', 'my_theme_enqueue_styles' );
    

    You can add more scripts and stylesheets to this function if you want to after a similar manner.

    That’s it! Your child theme is ready. Now it’s time for your creative tweaks.


    Step 2) Create Costum Content

    Let’s say that you want a costum frontpage:

    1. In the child theme create a new file.
    2. Save the file as front-page.php

    Add some content to the page, e.g.

    <h1>Hello World</h1>

    OK, I admit that this is not the most stunning design, you’ve ever laid your eyes upen. But have a look at your frontpage. It’ll display a “Hello World” as expected. You did not use one line of PHP or WordPress template tags. There’s no loop either.

    “What can you deduce from this, Sherlock?”

    “The game’s afoot, Watson!”

    Actually you can add any code you fancy. You don’t need to follow any restrictions made by the original theme. Now you are able to hardcode a cool splash for your website. If you want to, you can add wp_head() and wp_footer() in the code, e.g.

    <?php wp_head(); ?>
    </head>
    

    If you do so WordPress will enable the admin bar and add the WordPress head and footer scritpts and styles from the theme.

    Step 3) How to name the files

    The template hierarchy

    Actually you can modify any page or post after a similar manner. The secret is naming your costum files correctly, and here the template hierarchy diagram is the key we need. In the diagram you can find the front-page.php. Here are a few samples:

    • A page for categories: category.php
    • Costum design for a category with the slug icecream: category-icecream.php
    • A post with the slug whatever: page-whatever.php

    If you don’t add a loop to the page, you can only use hardcoded content on your costum pages.

    Sometimes that’s exactly what we need.

    Now you’re able to create a bunch of very personal costum pages for your content, such as:

    • Galleries
    • Animations
    • CV
    • Portfolio pages
    • Costum author pages


  • Skeleton and implemantation
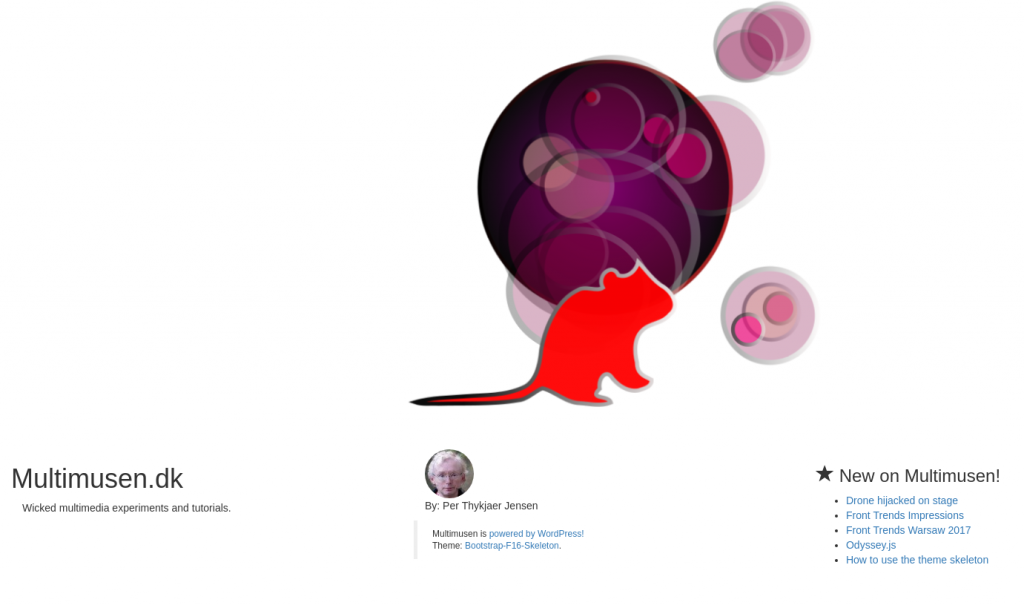
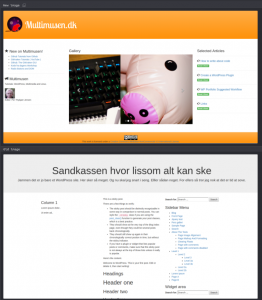
    Finished version with costum frontpage (top) and the skeleton boilerplate (bottom).

    In this tutorial you’ll learn how to create your own version of a skeleton theme.

    The “Skeleton-F16-Bootstrap” theme for WordPress is a boilerplate, or a place to start, if you want to create a Bootstrap theme from scratch. Or almost scratch that is. The basic files are ready. The top picture is a variant of the theme. The picture on the bottom is what it looks like, if you download the theme as is.

    Here are the two versions:

    How to fork the code

    In order to get started it’s convenient to have your own version of the code. Create a github profile, if you don’t have one yet.

    1. Log in on Github.
    2. Then navigate to the Skeleton-F16-Bootstrap.
    3. Fork the repository.

    On your Github page, you’ll find the fork, that is a copy of the original repository. You’ll be able to edit files and upload your own versions of the files. In this way the repository is a starting point for your new coding adventure.

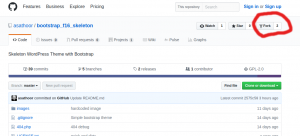
    The fork symbol
    In order to create a fork click on the fork symbol. Here it’s marked with a fancy red circle.

    When you click the fork symbol a new repository is created on your Github space. You can edit all files as you fancy.

    1. Add the forked repository to your Gitkraken (or whatever Github GUI you’re using).
    2. It’s often convenient to save the local files in your  ../wordpress/wp-content/themes/ folder on your localhost.
    3. Pull the files.
    4. Edit a file and save it.
    5. Stage the changes.
    6. Write a commit message.
    7. Push to the repository.

    On your own

    From this point you’ll be able to create your own markup. If you want to have 6 columns in stead of 3 on large screeen you can fix the Bootstrap / HTML markup. Bootstrap and Jquery will work out of the box. So you can add carousels, accordions and other fancy Bootstrap og Jquery stuff as you please. Since you’re in charge of the markup, you can even create hardcoded menus. You don’t have to do everything in the WordPress way.

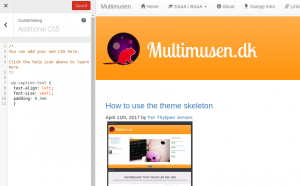
    The costum CSS editor is enabled in the plugin. You can experiment with styles in the editor. As soon as you’re satisfied with the styling, you can add the styles to style.css.

    Costum CSS
    Costum CSS: here the text describing an image is changed from centered to left. The font-size is changed too.

    The sample code has several branches. The origin master is the actual skeleton. The branch called Multimusen was developed as an implementation of the skeleton for my website Multimusen. Multimusen’s branch has several costum pages, such as pages for categories, or special designed pages like a CV or similar. In this case the CV should stand apart from other pages. The focus should be on the text, so asides such as the sidebar are removed. The markup and PHP for the costum page is found in page-cv.php. I guess that you don’t need a page exactly like this. But if you need one, you can create your own costum templates. Just copy a page template that’s similar. Edit the code, and name the file page-SLUG.php.

    In WordPress costum files have a name convention. The system is described in detail in the Theme Developer’s handbook.

    In fact: whatever you’re able to do with markup, you’ll be able to implement in a theme. So you can have a look at the Bootstrap grid tutorials on W3 Schools, and even add a Jquery theme after your own choice.

    If you want to use JavaScript libraries for animation or parallax you can either edit header.php and footer.php or add scripts via functions.php (don’t do both options!). Adding scripts via functions.php may seem a bit abstract. But it is the best practise.

    Here are a few libraries, that’ll add immersive experiences to your WordPress theme:

    Whatever you’re able to do with HTML, CSS, JavaScript and libraries – the same is possible in a WordPress theme.

    Proceed, and experiment according to your creative vision.

  • The newest version of WordPress came with a REST API. It will revolutionize the ways we think about themes. You don’t have to use PHP any more. With HTML, CSS and JavaScript you can get content via Json.

    What is REST API?

    The very short version is: WordPress will return Json objects from certain endpoints. Here’s a sample:

    yourWordPressSite.nu/wp-json/wp/v2/posts

    A URL like this will return a Json object with the 10 most recent post. Why don’t you try it in your browser:

    https://multimusen.dk/wp-json/wp/v2/posts

    But what’s the fuzz all about? Well JavaScript can transmute Json to content on a web page. So now you may program your frontend via JavaScript. This is really good news for Nodejs-developers. But in fact you may develop your web page in any language, that’s able to manipulate Json.

    REST API is much more that reading content. You can create, read, update and delete content on the server.


    With the REST API WordPress will open the gates to a very interesting future. Perhaps themes as we know them will be obsolete in the near future. Even the Dashboard could be something in the past.

    Bang the drums, and hoist the flags! WordPress  with REST API is here.

  • REST API
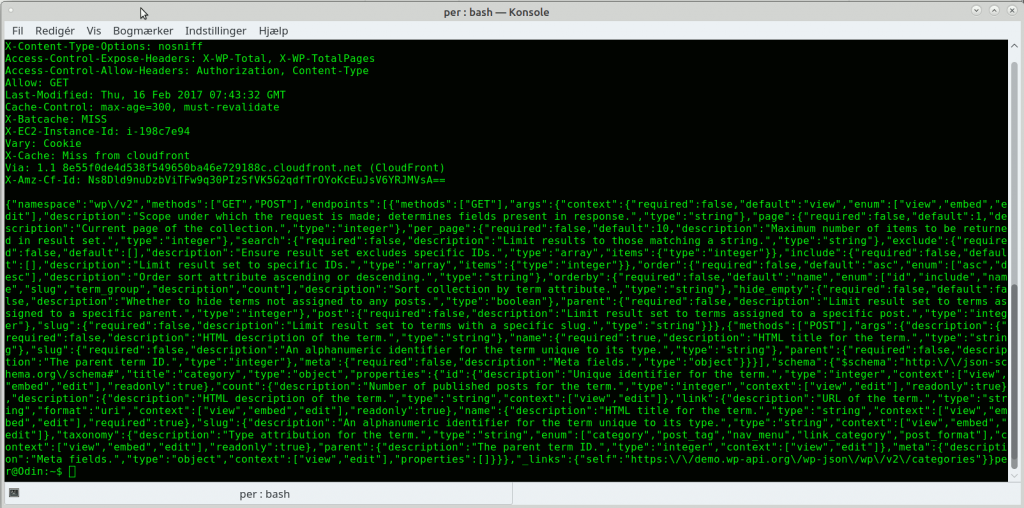
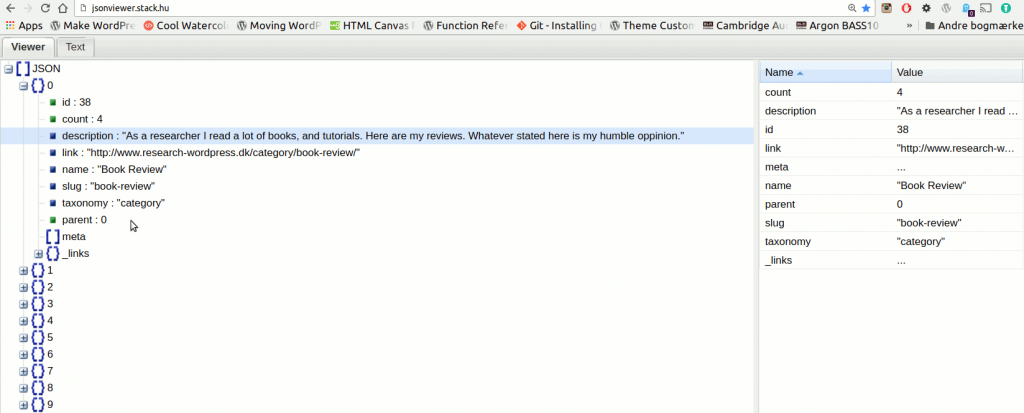
    An answer from the REST API. It’s a Json object, that was send to a Linux terminal via curl ( it’s a tool to transfer data from or to a server).

    “WordPress 4.7 comes with REST API endpoints for posts, comments, terms, users, meta, and settings.” (Source: WordPress’ text about the API).

    One of the great news in WordPress 4.7 is the REST API. Now it is possible to exchange data in the form of Json Objects.

    Let’s try out the REST API in a simple terminal. In bash try this:

    curl http://research-wordpress.dk/wp-json/wp/v2/categories

    Perhaps the result above seems like gibberish to the uninitiated. But if we use a Json parser online, you’ll get a human readable result.

    The Json object unfolded. You can see one category.
    The Json object unfolded. You can see one category.

    If you’re eyes are in top condition, you can see:

    • name: “Book Review”
    • description: “As a researcher I read a lot of books … etc.”

    So a standard WordPress installation is able to exchange data between a behemoth of platforms, such as apps on mobile devices, and any kind of code that’s able to process Json, such as:

    • Ajax
    • Python
    • Bash
    • PHP
    • Ruby
    • Nodejs
    • etc.

    The possibilities are virtually endless. REST API marks a huge step foreward.

    Read more: REST API Reference.

  • So the new verson of WordPress has arrived. With it came a new theme: Twenty Seventeen. It’s an attempt to combine the (perhaps too) popular “one-pager” with WordPress content-managing.

    The theme has many interesting features. One important addition is the .svg icon theme. These days the SVG format becomes more and more important. Twenty Seventeen may be a proof of concept here.

    Of course I had to try the theme.  The design style is “big image” or even “big video” if you dare to use that option.

    The theme has improved greatly since the beginning in october 2016. The process began on Github. Here a team from Automattic co-worked with the WordPress open source community. 68 participants or more gave input and suggested code.

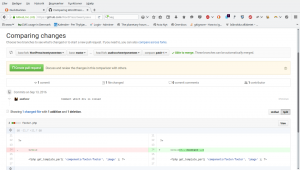
    Git proposals of changes
    Git proposals of changes. Here a suggestion for commenting is implemented.

    When the theme was ready for the core it moved to Slack. In the end it was integrated in the wordpress-core code.

    A web page is dedicated to the development process. Here you can see the mock-ups and follow the general development of the new core theme for WordPress.

    The image below is one of the “hi-fi mock-ups” that was used during the development of Twenty Seventeen.

    Home

  • Today’s question from a student: “How do we move a multisite WP?”. The Codex has this answer.

Enable Notifications OK No thanks

We use cookies - more information

Multimusen.dk will set a few cookies from Doubleclick, Google and the Social Media plugins they ay set some cookies. Some of my pages use APIs - such as YouTube, LinkedIn, Google Fonts, Google Maps, Mapbox, Spotify, Jetpack, Twitter, Facebook &c.. Such plugins may set the odd cookie.

Close