The weather in Aarhus via one of the widgets:
Category: Multimedia Design
Tutorials for multimedia designers.
-
The Secret of Touch Screens and Browsers in Full Screen Kiosk Mode
How to create a full screen web app on a touch screen for exhibitions – or where you could order a dish in a restaurant
In theory the kiosk mode should be easy to achieve. But there are a few pitfalls. Here is the key to a do it yourself kiosk solution. And how to avoid some of the stumbling blocks on the road.
MacOs – not so easy
The Mac boasts of user friendliness. That is: untill you try something new. Here is an easy to follow tutorial – and if you follow it you will be able to start a browser in kiosk mode from the commandline.
Mac: Problems and Solutions
Even if you manage to get your browser up and running in kiosk mode on your Mac the solution is far from “secure”. You are not allowed to remove the menu on Mac.
But you can hide the menu. However, the user is able to break out simply by placing his mouse where the menu is hidden.
A solution could be to hide the keyboard for the user. In that case it’s easy to design an interface for a touch screen. All you have to do is to add eventlisteners to icons or buttons.
But, if the user is allowed to use a keyboard MacOS certainly isn’t the best option.
Linux – more easy and more secure
Ubuntu saUbuntu – it’s more easy than you imagine
On a linux system the recipe is simple: open a terminal and fire off your favorite browser. Just add –kiosk after the browser name. And of course a relevant URL.
Ubuntu
Since Ubuntu is nothing but a flavor of Linux, you can launch a kiosk in all Linux distros. In kiosk mode the user cannot use the right click, the windows button, F11 for a smaller browser window – and so on.
It is possible to close the web app by ALT+F4.
But in Linux you can tweak the desktop. And you can tweak the shortcuts from the keyboard, so that ALT+F4 or even F11 does absolutely nothing.
In Ubuntu I would add such settings. If you create a “kiosk user”, you could set up the session in a way where the user will log into a kiosk mode. Linux is a multiuser system, so you could display the kiosk on a touch screen with mouse and keyboard – and even log remotely in via SSH.
WM – or window managers

Ratpoison WM – the logo say’s all. We don’t like rodents. If you don’t like the Gnome desktop that is shipped with Ubuntu, you could install one of the fun WMs, like Ratpoison. The WM is easy to configure, and if you don’t want a menu – just remove it!
Mostly the WM has a hidden config file. If you open it and follow the instructions inside the file it is easy to add and remove functionality to the system. You can edit the file in your favorite editor, like Atom, Vi, Nano etc.
The settings file in Ratpoison is:
~/.ratpoisonrcSince both Mac and Linux are based on a Unix kernel there might be some alternative WMs out there – even for your Mac. Microsoft is trying to seduce Linux these days. Hence, you may even be able to run some of these alternative WMs under Windows. But that’s beyond the scope of the article.
A magick cabinet with a touch screen and a wicked hidden Raspberry Pi running your web app from behind the scenes

Raspberry Pi with Linux is a powerful solution for a kiosk. Image source: https://www.piqsels.com/en/search?q=raspberry+pi Now we’ll go behind the scenes. Why not build a cabinet for the touch screen. Behind the scenes we will power the web app with a credit card sized computer. And yes: you can install an Apache server and run whatever websites you fancy in kiosk mode.
The Raspberry Pi is a very small computer. If you have a touch screen and hide the Pi behind it in a wooden or metal frame you’ll have more than enough power to drive a web app.
I have installed WordPress on a Pi, and it runs like a charm. With WordPress you’ll have an excellent Dashboard in the background that will power your kiosk solution. Here is the recipe for the solution.
And now you have more than enough ideas. Now you can build your own kiosk from scratch.
How about Windows?
I don’t use Windows, so here you have to experiment by your own ingenium. Probably you can run the firefox.exe file and add -kiosk in the terminal.
Here is a recipe from Firefox.
Good luck!
-
Rioch Theta 360 degree images in WordPress
Here is my very first experiment with the Rioch Theta 360 degree camera implemented in a WordPress post. As you can see the experiment was a success.
About the Image
The image was shot in the Old Town city museum in Aarhus with the Rioch Theta 360 degree camera. The camera was handheld during dark conditions. Hence the blur. Obviously I should have used a tripod / monopod.
Panellum
As the 350-degree image viewer I used code from the Panellum JavaScript library, see here.
In WordPress
- The image from the camera was simply uploaded to the media library in the Dashboard.
- Then the url to the image was copyed and inserted in the code as the const img.
- Note that you cannot have blank lines in the JavaScript. If you have blank lines WordPress will insert <p> tags – which will ruin the script totally.
Here is the code I used:
<!--  Add what you see below to a post or page
      the link to the image should be the link to the image
      either on your WordPress or server -->
<link rel="stylesheet" href="https://cdn.jsdelivr.net/npm/pannellum@2.5.6/build/pannellum.css">
<div id="panorama" style="width:600;height:400px;border:3px solid black;margin:auto;"></div>
<p><script type="text/javascript" src="https://cdn.jsdelivr.net/npm/pannellum@2.5.6/build/pannellum.js"></script>
<script>
  window.onload = function() {
    const author = "Per Thykjaer Jensen"
    const img = "https://multimusen.dk/wp-content/uploads/R0010030-scaled.jpg";
    pannellum.viewer('panorama', {
      "type": "equirectangular",
      "panorama": img,
      "title": "The Old Town - dec. 17th. 2021, Aarhus",
      "author": author,
      "autoLoad": true
    });
  } // document ready
</script></p>
Get the code on Github
-
10 Secrets: add APIs to WordPress without plugins
How to do it
In most cases you can add your own HTML, CSS and scripts to the page or post:
- Add costum HTML.
- Add the scripts and styles you need.
1) Google Maps
Find the location. Mark the location with a mouseclick in order to “activate” the marker. Then click on “Copy HTML”.
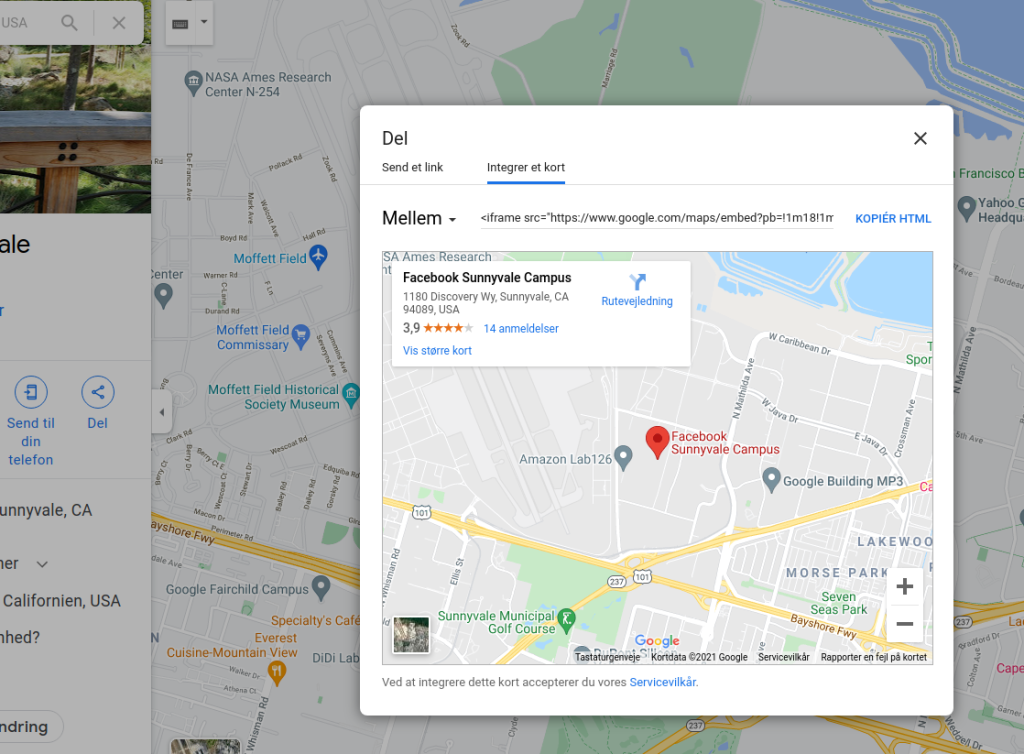
This is Silicon Valley. Click the share option. Then this dialog will open. Now you can click on one of the markers. It will turn red. Now click copy HTML Now add a costum HTML block in the editor, and paste the iframe code there:
Probably you’ll have to change some of the iframe settings, such as the width and height. For instance a width of 100% will give nice results.
If you are a lazy coder add a class for your maps in order to get a standard width and height.
Bonustip – style google maps.
2) Open Street Maps
If you don’t want a Google map try the open source alternative OpenStreetMaps. Navigate to the spot on the planet where you need a map. In the menu on he right side of the screen click “Share”. Then select “Add Marker”. Now you can copy the HTML, and add it to your page or post as we did it before.
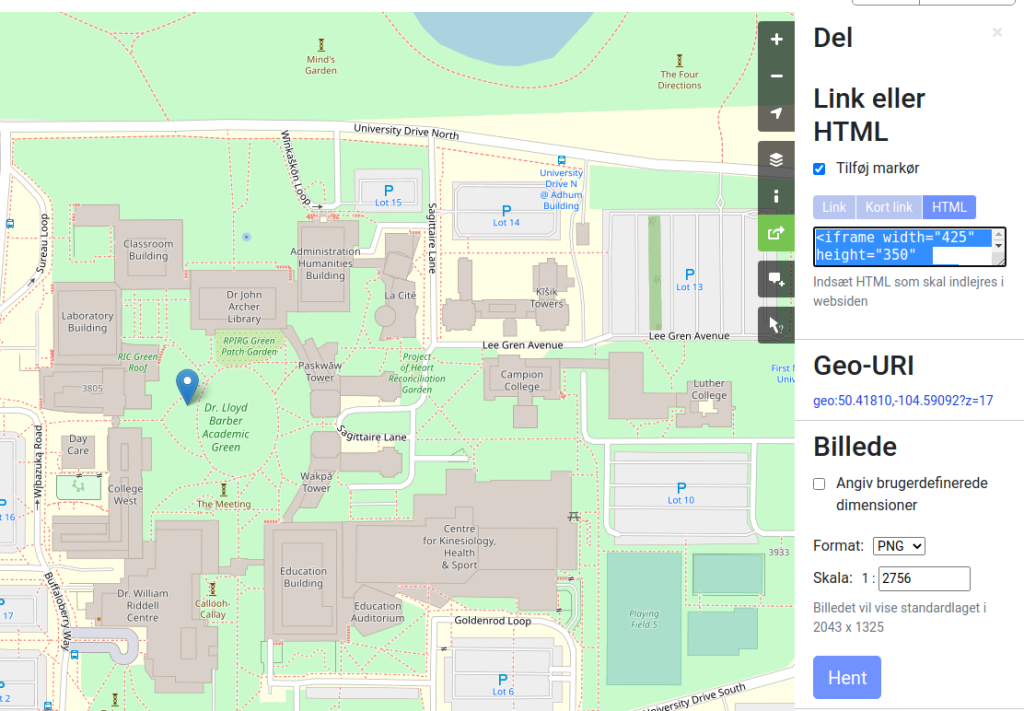
The campus at the University of Regina. When I visited the university I enjoyed the beautifull view over the Wascana Lake from the library. Now create a costum HTML block, and add your map.
If the map is placed to the far left the problem may be your theme. In that case try to sandwich the iframe in p-elements.
<p> <iframe .....></iframe> </p>Add markers to a Mapbox Map Shelters and kiosks in Aarhus added as layers after the instructions in the video above. All geolocations were downloaded from Open Data Arhus. (Remember to remove the deprecated “crs”-line from the dataset, then you can import the data).
3) Mapbox
Mapbox is an interesting extension to OpenStreetMap. In Mapbox you can style a map – so that the colors and fonts will match your styletile. Maps are creeated in the Studio. Again you can share maps with an iframe.
In Studio watch your map list. Then click Share. Click on the “Website Embed” button. Again this will give you an iframe, that you can add to your website.
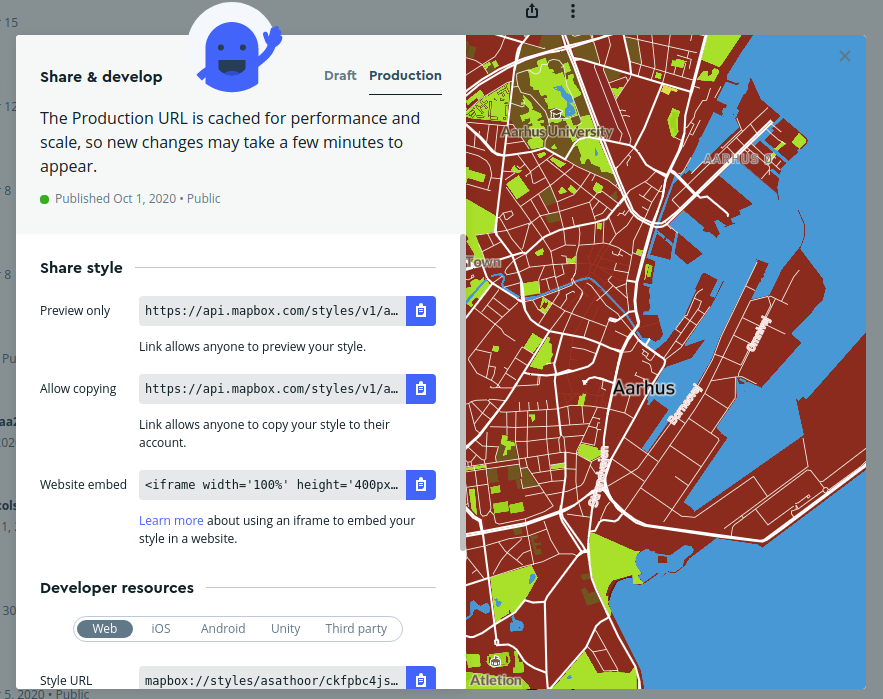
Let’s try to add Mapbox to the post or page. Create a costum HTML block, and see the result.
4) Mapbox with Markers
In Mapbox you can add markers in several ways. This can be done in numerous ways. By script or adding a marker layer in Mapbox Studio.
- First: you have to create or import a dataset with geojson data.
- Second: the dataset must be exported as a tile.
- Third: you can add the tile layer to one of your maps.
Here is a sample – shelters and kiosks near Aarhus with geojson datasets from Open Data Aarhus:
You could add a marker by JavaScript as in this tutorial. If you save the code as an HTML file, you could embed the map via an iframe.
In theory you could add the div with the map, the scripts and the CSS in a custom HTML block in the WordPress editor. However my experiments along these line only resulted in a “partial success“. Yeah the map was visible, but the markers were placed outside the map. That’s why I’d suggest the iframe solution.
If you have suggestions for a solution here please feel free to add them in the comments below.
Experiment – add a dataset in Mapbox
- Download the sample Washsington stations here.
- Now import the dataset in Mapbox Studio > Datasets.
- Modify the dataset if need be.
- In the dataset click the blue Export to Tileset button.
- In Styles add the dataset as a layer, and modify it – display icons or texts from the dataset on the map.
5) Twitter
Click the kebab next to your profile. Then copy the code to be embedded in a costum html block.
Åh BLACK FRIDAY. Jeg køber en pakke laktosefri smør. Det mangler i køleskabet. Og nej, jeg er ikke den som står i kø for at spare 20%, som man til enhver tid kan forhandle sig til. #blackfridayRendOgHop
— Per Thykjaer Jensen (@Pertjensen) November 26, 2021
6) Spotify
You can add a playlist from Spotify. Click the three dots and follow the instructions.
7) Instagram and Facebook
Have similar sharing options, however they tend to change according to the whims and fancies of these companies. There are APIs but these days the user experience is uphill. Probably you can find some free widgets.
In the past Snapwidget, Elfsite and Lighthouse were easy to use. Now “everyone has to pay and pay” as in Lou Reeds “Walk on the Wild Side”.
8) YouTube
Sharing videos on WordPress is easy: copy-paste the url to your video. Et voila!
9) Google Calendar
Follow this recipe – as usual add the code to a costum html block.
10) Figma
You can embed Figma prototypes in WordPress. Click the blue share button. Then < > get embed code.
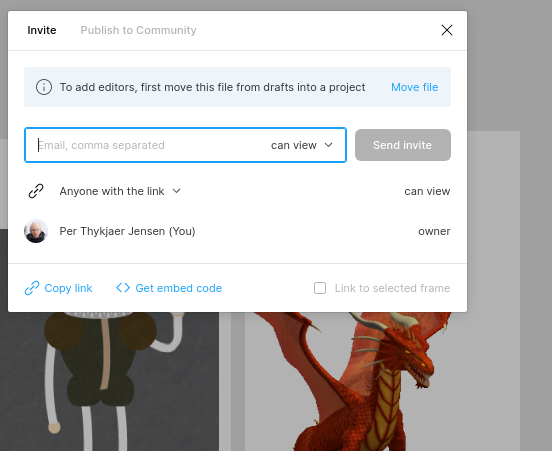
Then copy the code to be embedded, and – yeah again … add a custom HTML block.
Probably you’re able to do something similar if you use XD.
And now by thine own ingenium device your personal solutions with WordPress and other APIs
Now you have seen 10 samples where data from external APIs were presented on pages and posts via costum HTML. What is your favorite embed on web pages? Let us know in the comments below.
-
Add Fontawesome to WordPress
In this tutorial you’ll learn how to create a plugin that will add Fontawesome to your WordPress. Font awesome is a very large collection of icons for any webpage. Installing Fontawesome is easy. If you link to the CSS in the head section of your webpage, you’re ready to go. But how can we do this on WordPress?
The best solution is a permanent one. More than often you’d want icons from Fontawesome in the menus. You could add the link to Fontawesome in your childtheme. But then you’d have to add it again when you choose a new theme. We need a more permanent solution.
What we need is a plugin.
It is surprisingly easy to create a plugin for WordPress. Here is a step by step guide.
a) Create a directory for the files
First you have to create a directory for your files. The name of the directory is up to your imagination. But try to name your directory so that you know what the theme will do. In this case I choose the name:
fontawesome
b) Create some files
In the directory we need a few files. Create them in your favorite editor:
- index.php
- addFontawesome.php
c) index.php
Leave this file blank. The file is used for security reasons. If there is a blank index.php file in the directory, unwanted guests cannot see the content of the directory.
c) addFontawesome.php
This file is the actual plugin. Here we have to define the function that will add fontawesome to the <head> section of the active theme. A plugin will allways begin with a comment. WordPress will use this comment in order to display informations about the plugin in the Dashboard. Here is the comment we need:
<?php
/*
Plugin Name: add Fontawesome
Plugin URI: https://github.com/asathoor/plugins
Description: Will add the CSS for Fontawesome.
Version: 1.0
Author: Per Thykjaer Jensen
Author URI:https://multimusen.dk
Textdomain: Pers2020Child
License: GPLv3
About this version: Minor bug fix.
*/
Then we need a function, that will be able to add CSS to the <head> section of the active theme. Here we will use wp_enqueue_style:
function petj_fontawesome(){
  wp_enqueue_style(
    'petj-fontawesome',     'https://cdnjs.cloudflare.com/ajax/libs/font-awesome/6.0.0-beta3/css/all.min.css',
    array(),
    '6.0.0');
    }
wp_enqueue_style will add some informations about the CSS. In this case the ‘petj-fontawesome’ is the name we give the stylesheet in the system. The long URL
https://cdnjs.cloudflare.com/ajax/libs/font-awesome/6.0.0-beta3/css/all.min.css
Is the link to a Fontawesome CDN. If you click on the link you’ll see the styles that will be loaded.
array() will add the data as an array.
The numbers ‘6.0.0’ is the version of the script. If you add your own scripts you can give it any suitable number.
The file must end with an add_action. Such an action will execute the function above – and then the CSS will be part of the <head> section in WordPress.
Here is the add_action:
add_action('wp_enqueue_scripts', 'petj_fontawesome' );The add_action has two parts:
- wp_enqueue_scripts is a function that will add styles og scripts to WordPress.
- petj_fontawesome is the function we created before. So the functions is invoked and executed. Then the CSS will be part of your WordPress.
d) Prepare your plugin for installation
WordPress can install plugins via zip-files. Compress the directory with the files. Most operative systems have a compress option when you right-click the directory. Then a file called fontawesome.zip is created.
e) Install the plugin
Now go to the Dashboard in WordPress. In Plugins select add plugin. Choose the Upload File option. Follow the instructions on the screen, and remember to activate your new plugin.
f) Use Fontawesome
Now you can use Fontawesome. The icons are added via HTML, like this:
<i class="fa fa-car" style="font-size:60px;color:red;"></i>If you add code along these lines to a custom HTML block in the WordPress editor – or Elementor, the result will be this:
In the menus you can add the Fontawsome icons in the description. Now you can use the icons from Fontawesome in any theme.
-
Speed Up WordPress
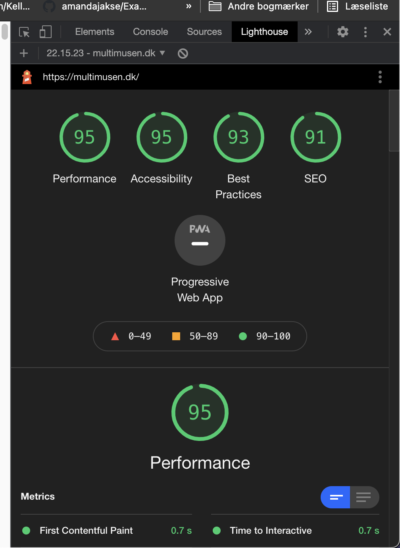
Lighthouse report in Chrome after speed optimization. Speed is very important online. First of all because the user’s get impatient after 3-4 seconds. Speed is also one of the factors that will improve your SEO ranking.
How do you speed up WordPress. First of all: use Lighthouse in the Chrome browser and follow the suggetions. On my website the images needed optimization. And for some reason the meta tag “description” was missing. Therefore the score was low.
Images
Some of my images were just too large. In the Media section you can crop and resize images. This will speed up things immediately.
Lighthouse suggested to install a lazy load plugin. Again the performance skyrocketed.
Missing Meta Description
The missing meta description ought to be a simple job for a plugin. I tried a few with no good result. Then I decided to add the missing SEO tags to the header.php.
I used the Open Graph tool in order to create the Social Media Specific tags. And an online meta tag creator. Again the result was amazing. The SEO score went from 87 to 91.
Below you see the meta tags I used:
<!-- Meta tags -->
  <meta name="description" content="A large collection of free tutorials about: WordPress, REST API, JavaScript. Also you can get insight into the art of databases, PHP and much more.">
  <meta name="keywords" content="WordPress, Linux, REST API, JavaSScript, PHP, free tutorial">
  <meta name="copyright" content="Per Skolander Thykjaer Jensen">
  <meta name="language" content="EN">
  <!-- /meta tags -->

  <!-- Open Graph Begin -->
  <meta property="og:title" content="Multimusen - tips, tricks and tutorials about WordPress and UX">
  <meta property="og:site_name" content="Multimusen.dk">
  <meta property="og:url" content="https://multimusen.dk">
  <meta property="og:description" content="Hundreds of tutorials about WordPress development, REST API, JavaScript. Tutorials about WordPress backend, the database and PHP. By Per Skolander Thykjaer Jensen, MA IT.">
  <meta property="og:type" content="website">
  <meta property="og:image" content="https://multimusen.dk/wp-content/uploads/cropped-cropped-cropped-multimusen-150-150-1.png">
  <!-- Open Graph End -->
Now the SEO stuff shoul go in my theme’s <head> section. In a child theme this is easy:
- Copy the file header.php from the parent theme folder to the child theme folder.
- Copy-paste the meta tags somewhere convenient in the <head> section.
- Save the file and upload header.php .
Cache
One of the things that will speed up WordPress is a good cache. The cache will create static pages. These pages will load faster.
But when you edit your code remember to clear the cache. If you don’t see the result right away try to clear the cache – both on WordPress and in your browser. Suddenly things will work out fine.
Experiment with the cache – this will make your site really fast.
-

WCEU 2021
This years WCEU is much more than yet another Zoom event. The conferencing platform is a great and pleasant surprise.
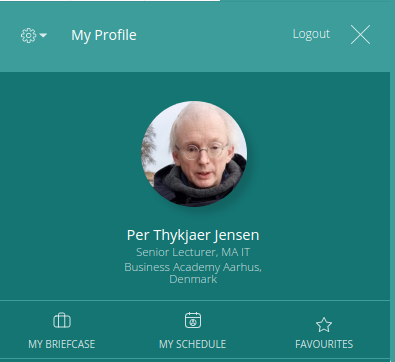
Profile … done … ready! Entering is as simple as clicking your personal link. Boom! After a small intro I created my user profile. And was ready to go. A few minutes later a company asked for an interview. Even before the event began we were networking.
So far I’ve attended sessions about Scrum, Gutenberg and O’Auth. One of the most interesting session was not a talk – but a coffe break with four developers from all corners of the World.
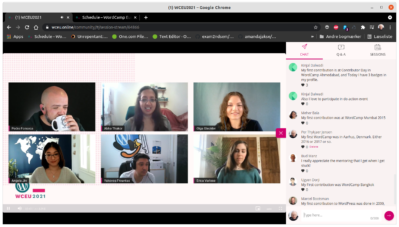
#WCEU 2021 Opening One of the developers recommended using the “WP Engine” plugin with the REST API if you want to use the styles from a block builder in the design.
Here is my planned schedule, however I’m sure that I may change my mind here and there. Here are the YouTube recordings from WCEU:
Figma / WordPress Prototyping
In the design team the Figma prototyping tools were introduced:
-
YouTube Tutorials
Feel free to follow and subscribe to my tutorials on YouTube
Here are a few of my tutorials on YouTube. Most of the tutorials give you sample code for the prototypes in projects or exercises. The tutorials are available via Github.
- HTML, CSS (MMD 1st. semester)
- Github (MMD: all classes)
- JavaScript (MMD: 2nd. semester)
- WordPress / REST API (MMD: 3rd. semester and above)
-

Github: Nice Code Review Feature
One of the new features on Github is code review. Here you can go in and add comments to specific code lines.
-
Adobe Animate and the OpenWeatherMap API
Part One: Adobe Animate and API
Do you want to fetch data from an API and use the data in your Adobe Animate CC creative work? Animate CC productions are made by JavaScript and HTML canvas. In theory getting data should work.
Let’s try!
OpenWeatherMap
The data from OpenWeatherMap is only available when you have a token. The first step is to create a user profile, and then to create a token. Then you can create the URL to fetch the weathere data.

Above you see the API call. That’s the information we need in order to get data from the website. The data will be returned as JSON, but we can fetch the content and display it in Adobe Animate. You can create the string along these lines:
var weather = 'https://api.openweathermap.org/data/2.5/weather?q=YOUR-CITY-HERE&appid=ADD-YOUR-TOKEN-HERE';The url will fetch data from the API in the form of JSON. The URL for the weather data is formed in the variable weather.
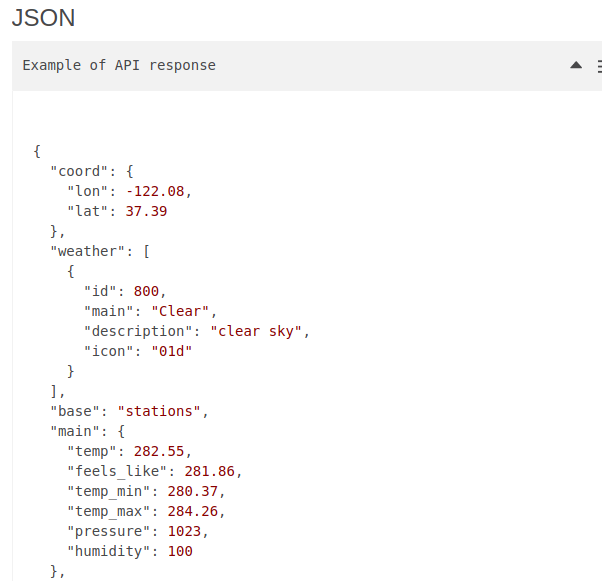
A JSON object from OpenWeatherMap. The fetch() function will use the variable above, and that’s how we get the data for the JavaScript into the document:
fetch( weather ).then( ... etc ... );Dynamic Texts
Now we have the data. Then we want to use the data in the design. Here we will work with Dynamic Text Fields.

Here the Dynamic Text Field is selected. In Propterties to the left it is named theCity. Now we can change the content dynamicly with JavaScript. On the stage you see two Dynamic Textfields called theDescription and theCity. If you want to change the text of these fields you could do it like this:
_this.theCity.text = “Hello World”;
But we need the text from the API. If you check out the content of the weather data in the console, you can see, that the name of the city is:
data.name
The city name is added to the Dynamic Text Fiels like this:
_this.theCity.text = data.name;
If you use the Inspect Tool in the browsesr you will be able to create Dynamic text fields for all the data in the object from OpenWeatherMap.
The JavaScript
In the actions layer you can add your Vanilla Javascript. Here is the script I used:
/**
 * OpenWeatherMap API Demo
 * IMPORTANT
 * Don't use the code beautifier. It will ruin the => in the Js.
 **/

// get this as a global var
var _this = this;

// Openweather API string
var weather = 'https://api.openweathermap.org/data/2.5/weather?q=Aarhus&appid=ADD-YOUR-TOKEN-HERE';

// get the weather data via query URI
fetch(weather).then( response=>{

	return response.json();

}).then(data => {

	// JSON data to the console for inspection
	console.log(data);

	// add the weadther description,texts or images to theDescription
	_this.theDescription.text = data.weather[0].description;
	_this.theCity.text = data.name;

}).
catch (err => {
	// Do something for an error here
	console.log('There was an error.');
});
Now you can test the production. Use the inspection tool in order to use the data from the JSON object in Dynamic Text Fields.
So that’s what it takes if you want to create an Adobe Animate production that can display data from OpenWeatherMap’s API. Of course you can work in a similar manner with other API’s and JSON objects.
Display the Weather Forecast in WordPress
In order to show your work in WordPress, you can use an iframe. Upload your production to a folder on your server. Then add am iframe along these lines:
<iframe src="https://yoursite.net/yourFolder/weather.html" height="480" frameborder="0" style="overflow=hidden;"></iframe>When you upload your work you’ll need the HTML, JavaScript file and the images/ folder – of course with the images in the folder. You don’t need the .fla file, since it’s for production only, but I would recommend to put it there anyway. If you want to change anything, you’ll know where it is.
Resources
-

Adobe Animate Weather App – now with weather conditions
Part Two: Adobe Animate and API
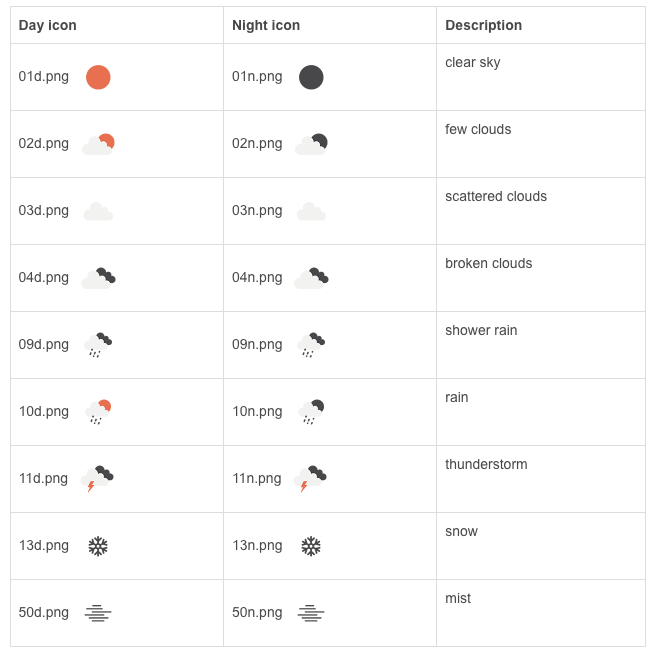
Here is the second part of my tutorial about Adobe Animate and the OpenWeatherMap API. In the previous article we got texts from the API. Now we want graphical symbols for the weather conditions. If we have a thunderstorm in Aarhus, then the app skould display a thunderstom symbol.
In this variation of my weather app the weather conditions are visualized in a movie. Each frame in the movie has a weather symbol inspired by the symbols from Openweathermap.
On the movie each frame is named after one of the weather conditions from OpenWeatherMap. The movie instance on the stage is named weatherConditions.
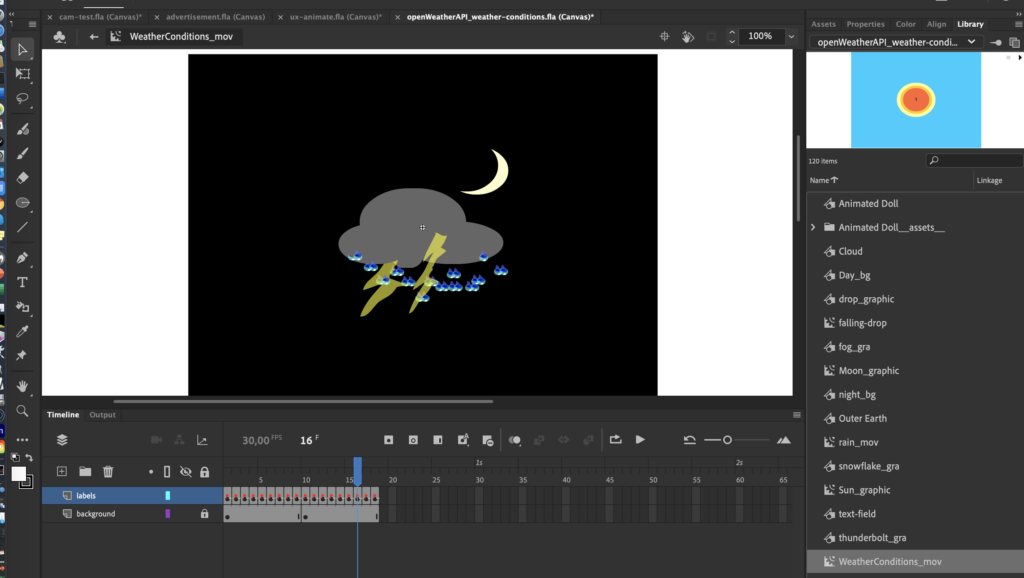
A weather condition.The thunderstorm has animated raindrops. Each frame in the weather condition movie has a label. The API can return 18 weather conditions, here are the labels:
Symbol Day Night Clear Sky 01d 01n Few Clouds 02d 02n Scattered Clouds 03d 03n Broken Clouds 04n 04n Shower Rain 09d 09n Rain 10d 10n Thunderstorm 11d 11n Snow 13d 13n Mist 50d 50n Weather conditions returned by OpenWeatherMap. The API could return something like “11n”. That would be a thunderstorm during the night, because the d and n after the numbers refer to day or night. Hence we have nine weather conditions with day and night graphics.
So we need a movie with 18 frames. Nine for the day. Nine for the night. Each frame shall have a label name. Then you can create JavaScript commands that will “go to a label and stop there”.
Since we know the name of the symbol, the weather condition will be displayed by a simple gotoAndStop command:
_this.weatherConditions.gotoAndStop( data.weather[0].icon );
// the api will return something like: 03d
Of course each frame could be animated ad libitum. You could add a movie clip with proper weather conditions to each of the frames. But now we have the skeleton for either a weather forecasst supported by an API.
This sample will open doors to the fascinating world of APIs. Now you know how to use Adobe Animate with APIs – and you can create movies controlled by the data returned from your favorite APIs.
If you have created something similar – let me know, and share your link. Post a comment below.
Here are the symbols from OpenWeatherMaps’ pages.
-

Adobe Animate CC
Interactive animation made with Adobe CC. Transitions via the camera feature.
- Sample file: click here to download.

