Per Thykjaer Jensen

  • Twenty Fifteen Child Theme
    Twenty Fifteen Child Theme

    So I’ve implemented a child theme for this research blog. For a while I’ve used Twenty Fifteen, because it’s a blog-oriented theme. But I have to hack some costum pages for the research project. I need pages that map the project, and pages that’ll sum up the proceedings of the present blog.

    That’s a job for a child theme!

    The code for the child theme is available on Github.

  • My new e-book “Teaching WordPress” is coming soon. The copy is almost ready for deploy. So today I’ve made some sketches for the frontpage. We’ll give these ideas to a designer.


  • Skeleton and implemantation
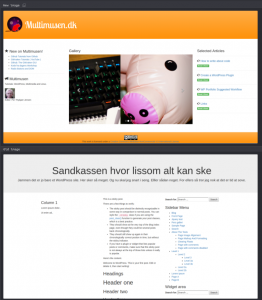
    Finished version with costum frontpage (top) and the skeleton boilerplate (bottom).

    In this tutorial you’ll learn how to create your own version of a skeleton theme.

    The “Skeleton-F16-Bootstrap” theme for WordPress is a boilerplate, or a place to start, if you want to create a Bootstrap theme from scratch. Or almost scratch that is. The basic files are ready. The top picture is a variant of the theme. The picture on the bottom is what it looks like, if you download the theme as is.

    Here are the two versions:

    How to fork the code

    In order to get started it’s convenient to have your own version of the code. Create a github profile, if you don’t have one yet.

    1. Log in on Github.
    2. Then navigate to the Skeleton-F16-Bootstrap.
    3. Fork the repository.

    On your Github page, you’ll find the fork, that is a copy of the original repository. You’ll be able to edit files and upload your own versions of the files. In this way the repository is a starting point for your new coding adventure.

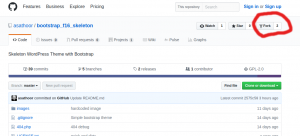
    The fork symbol
    In order to create a fork click on the fork symbol. Here it’s marked with a fancy red circle.

    When you click the fork symbol a new repository is created on your Github space. You can edit all files as you fancy.

    1. Add the forked repository to your Gitkraken (or whatever Github GUI you’re using).
    2. It’s often convenient to save the local files in your  ../wordpress/wp-content/themes/ folder on your localhost.
    3. Pull the files.
    4. Edit a file and save it.
    5. Stage the changes.
    6. Write a commit message.
    7. Push to the repository.

    On your own

    From this point you’ll be able to create your own markup. If you want to have 6 columns in stead of 3 on large screeen you can fix the Bootstrap / HTML markup. Bootstrap and Jquery will work out of the box. So you can add carousels, accordions and other fancy Bootstrap og Jquery stuff as you please. Since you’re in charge of the markup, you can even create hardcoded menus. You don’t have to do everything in the WordPress way.

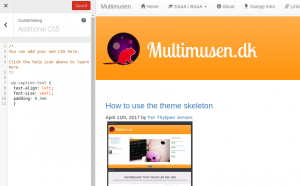
    The costum CSS editor is enabled in the plugin. You can experiment with styles in the editor. As soon as you’re satisfied with the styling, you can add the styles to style.css.

    Costum CSS
    Costum CSS: here the text describing an image is changed from centered to left. The font-size is changed too.

    The sample code has several branches. The origin master is the actual skeleton. The branch called Multimusen was developed as an implementation of the skeleton for my website Multimusen. Multimusen’s branch has several costum pages, such as pages for categories, or special designed pages like a CV or similar. In this case the CV should stand apart from other pages. The focus should be on the text, so asides such as the sidebar are removed. The markup and PHP for the costum page is found in page-cv.php. I guess that you don’t need a page exactly like this. But if you need one, you can create your own costum templates. Just copy a page template that’s similar. Edit the code, and name the file page-SLUG.php.

    In WordPress costum files have a name convention. The system is described in detail in the Theme Developer’s handbook.

    In fact: whatever you’re able to do with markup, you’ll be able to implement in a theme. So you can have a look at the Bootstrap grid tutorials on W3 Schools, and even add a Jquery theme after your own choice.

    If you want to use JavaScript libraries for animation or parallax you can either edit header.php and footer.php or add scripts via functions.php (don’t do both options!). Adding scripts via functions.php may seem a bit abstract. But it is the best practise.

    Here are a few libraries, that’ll add immersive experiences to your WordPress theme:

    Whatever you’re able to do with HTML, CSS, JavaScript and libraries – the same is possible in a WordPress theme.

    Proceed, and experiment according to your creative vision.

  • Here’s the challenge for the class:

    • Create a repo on Github.
    • Create a WordPress theme from scratch.

    During the six hour lesson files, such as:

    • functions.php
    • header.php
    • footer.php
    • style.css
    • index.php

    was presented one by one. The students had to create their own version of a WordPress theme on Github.

    As far as I could see there were five – six groupings in the class.Some students were able to create a WordPress theme, like:

    Some groups, however, found that the task was too difficult. I asked them, what was difficult, and got very honest feedback, like:

    • “We don’t understand the purpose of PHP.”
    • “Why can’t I see my localhost site online?”

    On Github I could see, that some students didn’t understand the concept of includes. So there was some truth in the utterance: “We don’t know what PHP is“. In fact the problem was deeper than that.

    Some 2nd semester students did not understand the basic structure of a HTML document. It was clear that at least some of them did not know which tags belonged to the head section, or the body section.

    When I reviewed the code from some groups, it was clear, that thy didn’t understand the concept of includes, like get_header() og get_footer(). The idea of partials was not understood, so the basic contruction of the WordPress theme was not understood at all.

    One or two students tried to develop the theme on say the desktop folder. Of course this approach wasn’t a success. I tried to help them moving the files to /wp-content/themes/

    I asked the students to share code and work together on Github. They used Gitkraken as a GUI. Some groups could do it. Other groups did not get the concept at all. However most groups were able to share and edit code in a previous lesson.

    Before you attempt to develop WordPress themes in the classroom make sure that the students have a basic understanding of concepts such as the structure of a HTML document.

    Also I have an eery feeling, that at least some students need a better understanding of:

    • Operative systems.
    • The difference between own files and files online.
    • Where the files are (the concept of directories)
    • That the ../htdocs folder has other functions than say the Desktop on a localhost
    • What Xampp, Mamp or similar does.

    Now here is the real didactic challenge. If the problem is a poor understanding of operative systems, localhost servers and PHP that’s where we have to put the efforts in the classroom.

    So it was agreed, that the class should be divided in two large groups:

    • Basic code understanding
    • WP theme developers
  • A few introductions to Github, and the gui GitKraken.


    A very fast video

    https://youtu.be/j1rP21RcbH0

    If you’ve got one hour …

    https://youtu.be/f0y_xCeM1Rk


  • The GitKraken app is a GUI for Github. Some people may prefer a GUI solution. The video above will give an impression of the app.

    Branches

    A strong feature on Github is the concept of brances. Here you may experiment with some code. Later on the experiments can be merged with the master code ( origin master ).

    1. Create a branch.
    2. Chekout the branch ( that is: work on the branch ).
    3. Edit the file.
    4. Make sure that the branch is chosen.
    5. Stage the changed file(s).
    6. Edit the commit message.
    7. Push to Github.

    Go to Github. If everything is ok the changes should be stored.

    Merge a branch to origin master

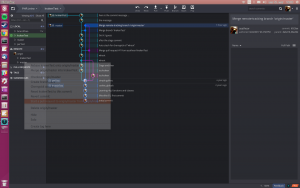
    When you’re satisfied with the code in the branch, you may want to merge the new work with the stem of the tree. The stem is called ‘origin master’. In GitKraken rightclick on remote / master. A popup menu will let you merge from the branch to the master:


    Click on the merge option. Then write a commit message, and click on Push.

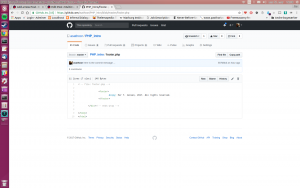
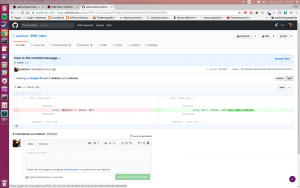
    On the Github web page you’ll be able to follow all the comitted changes:

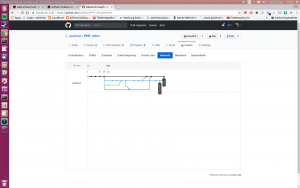
    Above you see the content of the file, and the history. The image below is the online version of the branches:

    ( The screencast and screendumps were made on a Ubuntu Linux system. )

  • Observations from a 2nd semeter class working on a magazine case. The class installed WordPress on localhosts a week before. During this class the students were introduced to themes and child themes. In the weeks to come the class will tweak a theme to suit a visual identity.

    Issues for students on Mac-laptops

    Before the teacher entered a student had a frustating problem. She had installed WordPress on a localhost environment via MAMP. But in the class she could not see the WP (WordPress) website. There was a message, like:

    “No database connection.”

    But it worked all right last week, she said. Noone really could say why such things happen. But I tried to help her. Checked the usual suspects, such as the settings in content.php, file and folder permissions. That kind of stuff. Nothing worked.

    In the end she had to reinstall MAMP. She reinstalled MAMP, only to find more or less the same error. For some reason MAMP used port 8888 ( http://localhost:8888 ). The wordpress install seemed ok.

    I suspected a missing database, but the link to PhpMyAdmin was missing in the MAMP admin panel. Actually she had to enter the link to:

    http://localhost:8888/phpmyadmin

    This url gave her access to the database.

    Here we could see, that the wordpress database was missing. She created the database, and edited the wp-config.php file. Now she was able to reinstall WP again.

    But then she could not upload pictures. Neither could 3 – 5 other students. I told them to give read-write permissions to the wp-content folder.

    A typical usecase

    This is a typical usecase, when we teach WordPress to students. The students on Windows systems don’t have such challenges ( apart from the occational blue screen of death, and related matters ). But the students on Mac systems, they’re in for a harder time.

    During a break the interaction teacher told me, that such problems are common. A Mac is cool, but the security issues with file and folder permissions are stumbling blocks.

    Roughly one third of the class used Mac laptops. So we know that they will experience issues.

    The Magazine Case

    Before the class the students worked on a magazine case. They had to imitate the style and fonts of several printed magazines. The HTML and CSS had to validate. And the teacher gave feed back to the groups.

    The teacher asked the groups where they were in this process. Most of the groups had worked with logos, and the importance of visual identity was discussed. He (re)introduced an interesting tool:

    “Use identifont to check whether your font is ok. Check whether your WP is still running, after the install last time.”

    And told, that some fonts may cost money, but there are also free fonts available. E.g. you don’t have to pay for a font like Copperplate, since it’s a standard font in most browsers. Anyway: use fallbacks.

    Theme and Child Theme

    Then the teacher gave an introduction to themes. Twenty Seventeen was installed on the fly. The class was introduced to the costumize tools in the theme.

    The students experimented with additional CSS. Most of them were able to hack small tweaks here. Some of them used developer toolbars, or the inspect element in Chrome or Firefox.

    It seemed to me that the styling was a challenge. How are the elements styled? Some used the inspect element tool in the browsers. But often their CSS-rules were “overruled” by the theme settings. So they had to find tweaks.

    They also tried to change the background and header images. Again some students experienced write-permission problems. Yes, they used a Mac-laptop. And the cure was the same as above.

    During a short break the teacher told me, that such issues are common, when the students show up with a Mac. It’s hard for them to figure out, where things are, and stuff like folder permissions are big issues here.

    The class was ready for the next level: child themes. The teacher wanted to demonstrate what a child theme is. He asked everybody to close the laptop lid, and listen. Unfortunately that was the moment when the projector decided to crash. There was nothing but a blue screen.

    The teacher returned to the old virtues, and drew the file structure on the wall. Perhaps that was a lucky punch, because the file structure became very clear in that wat. Then he explained:

    • the content of style.css
    • how to add the stylesheet from the “mother theme” in functions.php.

    The class worked for a while. Then it was time for lunch. Everyone walked to the canteen.

    Thanks to
  • How many times have my Tweeps and blog posts been read? It is impossible to know such a thing. On the other hand, it is possible to follow statistics on Twitter and on my web server.

    Here’s a quick and dirty status over the media impact of the research project “What You Should Know About WordPress”. If we add the tweeps and the visitors at my website, there are around 9171 visits or reads.

    It’s easy to follow the statistics on Twitter. On research-wordpress.dk I have counted visitors. After all: there’s a good chance that they are human.

    Projekt impact    
    Tweets: 7 (only relevant tweeps counted) 1365 impressions
    Website: 89 posts 7806 visitors
    MDU 60 persons
    Slack ( not counted )
    make.wordpress.org ( not counted )
  • Gist: How to manipulate the DOM via event listeners.


  • Moe Tucker played drums in the Velvet Underground. Pale Blue Eyes lyrics and music by Lou Reed (1969).

  • The newest version of WordPress came with a REST API. It will revolutionize the ways we think about themes. You don’t have to use PHP any more. With HTML, CSS and JavaScript you can get content via Json.

    What is REST API?

    The very short version is: WordPress will return Json objects from certain endpoints. Here’s a sample:

    yourWordPressSite.nu/wp-json/wp/v2/posts

    A URL like this will return a Json object with the 10 most recent post. Why don’t you try it in your browser:

    https://multimusen.dk/wp-json/wp/v2/posts

    But what’s the fuzz all about? Well JavaScript can transmute Json to content on a web page. So now you may program your frontend via JavaScript. This is really good news for Nodejs-developers. But in fact you may develop your web page in any language, that’s able to manipulate Json.

    REST API is much more that reading content. You can create, read, update and delete content on the server.


    With the REST API WordPress will open the gates to a very interesting future. Perhaps themes as we know them will be obsolete in the near future. Even the Dashboard could be something in the past.

    Bang the drums, and hoist the flags! WordPress  with REST API is here.

Enable Notifications OK No thanks

We use cookies - more information

Multimusen.dk will set a few cookies from Doubleclick, Google and the Social Media plugins they ay set some cookies. Some of my pages use APIs - such as YouTube, LinkedIn, Google Fonts, Google Maps, Mapbox, Spotify, Jetpack, Twitter, Facebook &c.. Such plugins may set the odd cookie.

Close